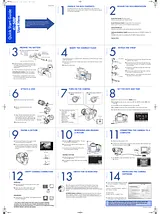
빠른 설정 가이드차례UNPACK THE BOX CONTENTS1Provided accessories may differ depending on the camera kit.1Make sure you have all the items shown in the Provided Accessory List (printed separately).1REVIEW THE DOCUMENTATION1Quick Start Guide (this document)1Getting started with your digital camera.1Quick Reference Guide (reverse side of this document)1Quick guide to using common features and functions.1Advanced Manual1Detailed instructions on all camera features and functions.1Software Installation Guide (separate document on OLYMPUS Master CD- ROM)1Detailed instructions on installing the OLYMPUS Master software.1System chart1PREPARE THE BATTERY1a. Attach the battery to the charger.1b. Slide the battery compartment lock to ) and open the battery compartment cover. Load the battery as shown in the illustration.1c. Slide the battery compartment lock to =.1Unloading the battery: Slide the battery compartment lock and remove the battery.1INSERT THE COMPACT FLASH1This camera can use a Compact Flash, Microdrive or xD-Picture Card. These cards are optional.1a. Insert the card with the contact area facing in the direction shown in the illustration.1b. Close the card cover.1ATTACH THE STRAP1a. Thread one end of the strap through the strap eyelet on the camera.1b. Thread the end of the strap through the ring, then thread it through the stopper as indicated by the arrows.1c. Thread the strap back through the other hole of the stopper.1d. Pull the other side of the strap tight, making sure that it is fastened securely.1e. Repeat steps (a) - (d) to attach the other end of the strap to the other eyelet.1ATTACH A LENS1a. Remove the rear cap from the lens.1b. Remove the body cap from the camera.1c. Align the lens attachment mark (red) on the camera with the alignment mark (red) on the lens, then insert the lens into the camera’s body. Rotate the lens clockwise until you hear it click.1d. Remove the lens cap.1TURN ON THE CAMERA1SET THE DATE AND TIME1a. With the camera on, press the MENU button.1b. Use ac to select tab, then press d. Use ac to select X, then press d.1c. Use ac to select the date format, then press d.1d. Use ac to set each item and press d to move to the next item.1e. Press the i button when you have finished entering the date and time.1TAKING A PICTURE1a. Place the AF frame on the subject while viewing through the viewfinder.1AF frame1b. Press and hold the shutter button halfway to lock the focus and exposure, then press the shutter button completely to take the picture.1REVIEWING AND ERASING A PICTURE1a. Press the q (playback) button. The last picture taken is displayed.1b. Use the arrow pad to select images you want to view.1c. To return to the shooting mode, press the shutter button halfway.1a. Select the picture you want to erase and press the S button.1b. Use ac to select [YES], then press the i button.1CONNECTING THE CAMERA TO A COMPUTER1a. Make sure the camera is off.1b. Connect the camera to the computer using the USB cable (included). Set the camera’s power switch to ON.1c. Use ac to select [STORAGE]. Press the i button.1VERIFY CAMERA CONNECTION1a. From the desktop (“Start”menu for XP), open “My Computer”.1b. Verify that the “Removable Disk” icon representing the camera is displayed.1a. Verify that the “NO_NAME” icon representing the camera is displayed.1ABOUT THE CD-ROM DISK1Now that you’ve mastered the basic functionality of your new Olympus Digital Camera, you are ready to begin exploring the possibilities that digital photography brings to your computer. Activities such as photo editing, printing and much more...1OLYMPUS Master software: Download pictures from the camera, view, organize, retouch, e-mail and print your digital photos and movies and more! This CD also contains the complete software users manual in Adobe Acrobat (PDF) format.1INSTALLING THE CAMERA SOFTWARE1a. Insert the OLYMPUS Master CD-ROM into your computer’s CD-ROM drive.1b. For Windows:1Click the “OLYMPUS Master” button in the “Setup” window.1For Macintosh:1Double-click the “Installer” icon.1c. Follow the on-screen instructions. For more details, click “Please Read First”.1VH3412011Quick Start Guide1Printed in China1Quick Reference Guide21. Camera Diagram and Controls22. How to use the mode dial23. How to use the buttons and control dial24. How to Use the Autofocus25. Flash Modes26. Image Quality Modes27. Viewing Pictures on a TV28. How to Erase All Pictures29. E-mailing a Picture210. Printing a Picture2CAMERA DIAGRAM AND CONTROLS2HOW TO USE THE MODE DIAL2HOW TO USE THE BUTTONS AND CONTROL DIAL2This camera has a variety of functions to enable you to optimize settings for various shooting conditions. You can set the functions using the buttons and the control dial while viewing the monitor.2F (Exposure compensation) button : Sets the exposure compensation value.2WB (White balance) button : Selects the white balance appropriate to the light source from the following options: Auto, preset white balance settings, customized white balance settings or registered white balance.2(AF frame selection) button : Selects the AF frame, allowing you to perform multiple AF or to perform AF using one of the 3 frames.2ISO button : Sets the ISO sensitivity.2(Metering) button : Selects the metering mode.2AF (Focus mode) button : Selects the focus mode.2</Y/j (Remote control/Selftimer/Drive) button : Sets Remote control / Selftimer / Drive.2a. Press the button for the function you want to set (direct button). The direct menu is displayed.2b. Use the control dial to set.2S (Erase) button : Erases unwanted images.2INFO (Information display) button :2Shooting : Displays shooting information on the control panel screen.2Playback : Displays shooting information or histogram of the recorded image. Each time this button is pressed, the information display is changed.2# (flash) switch : Raises the flash.2AEL button : Locks the exposure.2V (One-touch WB) button : Saves optimum white balance for the current shooting conditions.2q (Playback) button : Plays back images on the monitor.2MENU button : Displays the menu.20 (Protect) button : Protects images from being accidentally erased.2HOW TO USE THE AUTOFOCUS2a. While positioning the AF frame over the subject, press and hold the shutter button halfway.2b. The AF confirmation mark indicating that the focus and exposure are locked remains lit as long as the shutter button is kept depressed.2AF confirmation mark2c. Press the shutter button completely to take the picture.2FLASH MODES2This camera features multiple flash modes. You can select the appropriate flash mode to the suit the situation.2Manual flash : With [MANUAL FLASH] to set to [ON], you can set the amount of light (FULL, 1/4, 1/16, or 1/64) in the flash mode setting.2IMAGE QUALITY MODES2Your camera is equipped with multiple image quality modes, which determine the quality and image size of the pictures you take. Below is a general description of the commonly used modes. For a detailed description of all quality modes, refer ...2VIEWING PICTURES ON A TV2a. Turn the camera and TV off, and connect the video cable as illustrated.2b. Turn on the TV and set it to the video input mode. For details on switching to the video input mode, refer to the TV’s instruction manual.2c. Turn the camera on and press the q (playback) buttton.2Note: If the pictures are not displayed, consult your TV manual to set up the video source.2HOW TO ERASE ALL PICTURES2WARNING - PERFORMING THESE STEPS WILL DELETE ALL STORED PICTURES!2a. Press the MENU button. Use ac to select [], then press d.2b. Use ac to select [CARD SETUP], then press d.2c. Use ac to select [ALL ERASE], then press the i button.2d. Use ac to select [YES], then press the i button.2E-MAILING A PICTURE2Using the OLYMPUS Master software (included), you can share your pictures with others by using the built-in e-mail feature.2After installing OLYMPUS Master, open the program and click “ Browse Images”. From the “Browse” window, select the picture(s) you want to send and click the “ E-mail” tool button.2At this time, you can resize your pictures to make them more manageable for e- mail. This helps you stay within the e-mail capacity limitations set by your e-mail provider.2When finished, click the “ Launch Mailer” button at the bottom of the window. Your default e-mail program will open, and the selected picture(s) will automatically be attached to a new message.2PRINTING A PICTURE2Using the OLYMPUS Master software (included), you can make prints of your pictures using your own photo printer.2After installing OLYMPUS Master, open the program and click the “Print Images” icon on the main menu. You can create many different types of prints such as an index print, photos, albums, or calendars. Simply select the image(s) and add them ...2You can also order prints online using the “Print Online” feature in OLYMPUS Master.2Alternatively, you can print your pictures by connecting your PictBridge* compatible camera directly to a PictBridge* compatible printer, such as the Olympus P-10 Digital Photo Printer. This permits fast, easy printing without using a computer.2* For detailed instructions on using PictBridge, please refer to your camera’s Advanced Manual.2CONTACT INFORMATION2Two Corporate Center Drive, P.O. Box 9058, Melville, NY 11747-9058224/7 online automated help: http://www.olympusamerica.com/E12Phone customer support: 1-800-260-1625 (toll free)2Our phone customer support is available from 8am - 10pm, (Monday to Friday) ET2E-mail: e-slrpro@olympusamerica.com2Olympus software updates can be obtained at: http://olympus.com/digital2It is strongly recommended that you follow these step-by-step instructions to set up and quickly begin using your new Digital Camera.1Start Here1a. Set the mode dial to AUTO.1b. Set the power switch to ON.1c. While looking though the viewfinder, rotate the diopter adjustment dial little by little. When you can see the AF frame clearly, adjustment is complete.1크기: 869킬로바이트페이지: 2Language: English매뉴얼 열기
매뉴얼 소개차례Safety precautions5Attaching the strap11Preparing the battery12Loading the battery13Lens basics14Usable lenses14Attaching a lens to the camera15Card basics17Usable cards17Inserting a card18Power on20Date/time setting21Holding the camera22Adjusting the viewfinder’s diopter23Shooting24Playback26What you can do with OLYMPUS Master software27Information28Specifications28크기: 5.94메가바이트페이지: 116Languages: English, Français, Español, Deutsch매뉴얼 열기
사용자 설명서차례How to use this manual2How to read the instruction pages3Safety precautions101 Basic operations17How to use the mode dial18Easy shooting modes18Advanced shooting modes19Control panel screen and function settings20Control panel screen display20How to make function settings202 Things to know beforeshooting25How to use card media26Selecting the card type26Formatting the card26If correct focus cannot be obtained27How to use focus lock(if the subject is not positioned in the center of the frame)27Selecting the record mode29Types of record modes29How to select the record mode30Setting the number of pixels and compression rate303 Selecting the right modefor shooting conditions32Shooting modes33Easy shooting modes34Advanced shooting modes39P : Program shooting39A : Aperture priority shooting41S : Shutter priority shooting43M : Manual shooting45Preview function474 Various shooting functions48Auto bracketing49Flash shooting50Flash mode50Manual flash52Setting the flash mode54Using the built-in flash55Flash intensity control56Flash bracketing57External electronic flashes (optional)57Using the external electronic flash58Super FP flash60Using commercially available flashes60Non-specified commercial flashes61Single-frame shooting/sequential shooting62Self-timer shooting63Remote control shooting655 Focusing functions68AF frame selection69Focus mode70S-AF (single AF) shooting71Simultaneous use of S-AF mode and MF mode (S-AF+MF)71C-AF (continuous AF) shooting72Simultaneous use of C-AF mode and MF mode (C-AF+MF)72Manual focus (MF)73MF bracketing74AF illuminator75Shutter release priority756 Exposure, image and color76Metering mode — Changing the metering system77Exposure compensation — Varying the image brightness79AE lock — Locking the exposure81ISO — Setting the desired sensitivity to light82AE bracketing83White balance — Adjusting the color tone85Setting the auto/preset white balance87Setting the custom white balance89Setting the one-touch white balance90WB Compensation91WB bracketing92Picture mode93Gradation94Shading compensation94Noise reduction95Color space96Anti-shock967 Playback97Single-frame playback98Close-up playback99Light box display100Index display101Calendar display102Information display103Slideshow106Rotating images107Playback on TV108Editing still images109Copying images113Protecting images — Preventing accidental erasure114Erasing images115Single-frame erase115All-frame erase115Erasing selected frames1168 Customizing the settings/functions of your camera117Custom reset setting118AEL/AFL mode121AEL/AFL memo123AEL metering123EV step123ISO step124ISO boost124ISO limit124Compensating all WB125Manual flash125Speed synchronization126Auto flash popup126Customizing the control dial’s function127(one-touch WB)button function128My Mode setting128Reset lens129Focus ring129Priority setting129Quick erase130Erasing RAW and JPEG files130File name131Rename file132Rec view - Checking the picture immediately after shooting132Setting the warning tone133Monitor brightness adjustment133Sleep timer133USB mode134Changing the display language135Selecting the video signal type before TV connection135Button timer136Auto power off136Start-up screen137Changing monitor color137Firmware137Setting the date/time1389 Printing139Print reservation (DPOF)140Flowchart for print reservation141Selecting the print reservation mode142Selecting pictures you want to print142Setting printing data142Confirming your print setting143Resetting print reservation143Direct printing (PictBridge)145Connecting the camera to a printer146Easy printing147Flowchart for custom printing147Selecting the print mode148Setting the print paper items149Selecting pictures you want to print149Setting printing data150Printing150If an error code is displayed15110 Transferring images to acomputer152Flowchart153Using the provided OLYMPUS Master software154What is OLYMPUS Master?154Installing OLYMPUS Master155Connecting the camera to a computer159Starting OLYMPUS Master161Displaying the camera’s images on your computer162Downloading images to save on your computer162Disconnecting the camera from your computer163Viewing still images164Printing images165Transferring images to your computer without using OLYMPUS Master16611 Appendix167If you encounter problems168Error codes168Troubleshooting169Camera maintenance174Cleaning and storing the camera174Cleaning mode — Removing dust on the CCD175Pixel mapping — Checking the image processing functions176Glossary17712 Information182Menu directory183Available functions by shooting mode187Names of parts190Camera190Viewfinder indications192Monitor indications (only for playback)193Control panel screen194Information196Specifications19613 Accessories198BLM-1 Li-ion Battery / BCM-2 Li-ion Battery Charger199How to use the LBH-1 Lithium Battery Holder206ZUIKO DIGITAL interchangeable lenses208ZUIKO DIGITAL 14-45mm f3.5-5.6210ZUIKO DIGITAL 17.5-45mm f3.5-5.6212Index214크기: 15.3메가바이트페이지: 216Language: English매뉴얼 열기