User ManualTable of ContentsADDENDUM1FRONT MATTER3TABLE OF CONTENTS7ABOUT THIS MANUAL10INTRODUCTION12CHAP 1-SETTING UP THE PRINTER16Unpacking the Printer17Checking the Parts18Removing the Protective Materials19Choosing a Place for the Printer22Assembling the Printer24Installing the Ribbon Cartridge24Testing the Printer28Plugging in the Printer28Running a Self Test30Solving any Self Test Problems39Connecting the Printer to Your Computer41The Parallel Interface42The Serial Interface46Setting Up Your Application Software51CHAP 2-PAPER HANDLING53Using the Two-Tractor System54Positioning the Paper Supply54Loading Paper Onto the Front Tractor56Loading Paper Onto the Rear Tractor63Switching Between Front and Rear Tractors72Changing the Paper76Printing on Special Paper81Copy Mode81Multi-Part Forms82Labels84CHAP 3-USING THE PRINTER86Operating the Control Panel87Lights87Buttons89Other Control Panel Features91Setting the DIP Switches92Changing a DIP Switch Setting92The DIP Switch Tables95The DIP Switch Functions99Page Length102Skip Over Perforation103Using the Paper Memory Feature105Saving Paper Format and Thickness Information106Saving Information for Overlapping Mulit-Part Forms106Adjusting the Top of Form Position118Adjusting the Printing Position122Using Short Tear-Off125Selecting Typestyles128Character Fonts128Character Spacing130Condensed Mode131Selecting an International Character Set132Choosing a Character Table134Data Dump Mode136CHAP 4-SOFTWARE AND GRAPHICS139Enhancing Your Printing140Print Quality and Fonts140Character Spacing141Character Size142Special Effects and Emphasis143Selecting Typestyles with Master Select146Graphics148The Print Head149The Graphics Commands151Column Reservation Numbers152Printing Simple Patterns152Printing Taller Patterns154Designing Your Own Graphics155Individual Graphics Commands158The Reassignment Command158User-defined Characters160Designing your characters161Sending information to your printer162Printing User-defined Characters164Copying ROM Characters to RAM165Mixing Print Styles166CHAP 5-USING THE PRINTER OPTIONS167Pull Tractor168Installing the Pull Tractor168Paper handling171Removing the pull tractor181Paper Cutter185Installing the Paper Cutter185Paper Handling189Removing the Paper Cutter194Interface Boards198Choosing an interface198Compatible Interfaces199Installing an Interface Board199#8143 New Serial Interface Board205CHAP 6-MAINTENANCE207Cleaning the Printer208Replacing the Ribbon210Transporting the Printer215CHAP 7-TROUBLESHOOTING219Problems and Solutions220Power Supply221Printing222Paper Handling231Options236CHAP 8-TECHNICAL SPECIFICATIONS242Printer Specifications243Printing243Paper244Mechanical250Electrical251Environment251CHAP 9-COMMAND SUMMARY260Using the Command Summary261Control Key Start263Command In Numerical Order264Epson ESC/ P Commands Arranged by Topic268Printer Operation268Data Control271Vertical Motion272Horizontal Motion278Overall Printing Style282Print Size and Character Width284Print Enhancement288Word Processing292Character Tables293User-defined Characters295Graphics297IBM Emulation Mode Commands Arranged by Topic300Commands That Duplicate Epson ESC/P Commands300Commands That Differ From EPSON ESC/P Commands301APPENDIX310Proportional Width Table311Character Tables315Italic Character Tables316Epson Extended Graphics Character Table317IBM Emulation Mode318INDEX331QUICK REFERENCE338Size: 4.65 MBPages: 346Language: EnglishOpen manual
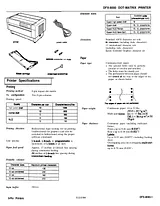
Product DatasheetTable of ContentsPRINTER SPECIFICATIONS1Printing1Paper1Mechanical2Electrical3Environment3APPLICATIONS SOFTWARE3CONTROL PANEL3SETTING THE DIP SWITCHES4DEFAULTS5SELECTING CHARACTER SETS5PULL TRACTOR6PAPER CUTTER6COMMANDS IN NUMERICAL ORDER6INSTALLATION / SUPPORT TIPS8Physical lnstallatlon8Software lnstallation8Size: 299 KBPages: 8Language: EnglishOpen manual
User ManualTable of ContentsADDENDUM1FRONT MATTER3TABLE OF CONTENTS7ABOUT THIS MANUAL10INTRODUCTION12CHAP 1-SETTING UP THE PRINTER16Unpacking the Printer17Checking the Parts18Removing the Protective Materials19Choosing a Place for the Printer22Assembling the Printer24Installing the Ribbon Cartridge24Testing the Printer28Plugging in the Printer28Running a Self Test30Solving any Self Test Problems39Connecting the Printer to Your Computer41The Parallel Interface42The Serial Interface46Setting Up Your Application Software51CHAP 2-PAPER HANDLING53Using the Two-Tractor System54Positioning the Paper Supply54Loading Paper Onto the Front Tractor56Loading Paper Onto the Rear Tractor63Switching Between Front and Rear Tractors72Changing the Paper76Printing on Special Paper81Copy Mode81Multi-Part Forms82Labels84CHAP 3-USING THE PRINTER86Operating the Control Panel87Lights87Buttons89Other Control Panel Features91Setting the DIP Switches92Changing a DIP Switch Setting92The DIP Switch Tables95The DIP Switch Functions99Page Length102Skip Over Perforation103Using the Paper Memory Feature105Saving Paper Format and Thickness Information106Saving Information for Overlapping Mulit-Part Forms106Adjusting the Top of Form Position118Adjusting the Printing Position122Using Short Tear-Off125Selecting Typestyles128Character Fonts128Character Spacing130Condensed Mode131Selecting an International Character Set132Choosing a Character Table134Data Dump Mode136CHAP 4-SOFTWARE AND GRAPHICS139Enhancing Your Printing140Print Quality and Fonts140Character Spacing141Character Size142Special Effects and Emphasis143Selecting Typestyles with Master Select146Graphics148The Print Head149The Graphics Commands151Column Reservation Numbers152Printing Simple Patterns152Printing Taller Patterns154Designing Your Own Graphics155Individual Graphics Commands158The Reassignment Command158User-defined Characters160Designing your characters161Sending information to your printer162Printing User-defined Characters164Copying ROM Characters to RAM165Mixing Print Styles166CHAP 5-USING THE PRINTER OPTIONS167Pull Tractor168Installing the Pull Tractor168Paper handling171Removing the pull tractor181Paper Cutter185Installing the Paper Cutter185Paper Handling189Removing the Paper Cutter194Interface Boards198Choosing an interface198Compatible Interfaces199Installing an Interface Board199#8143 New Serial Interface Board205CHAP 6-MAINTENANCE207Cleaning the Printer208Replacing the Ribbon210Transporting the Printer215CHAP 7-TROUBLESHOOTING219Problems and Solutions220Power Supply221Printing222Paper Handling231Options236CHAP 8-TECHNICAL SPECIFICATIONS242Printer Specifications243Printing243Paper244Mechanical250Electrical251Environment251CHAP 9-COMMAND SUMMARY260Using the Command Summary261Control Key Start263Command In Numerical Order264Epson ESC/ P Commands Arranged by Topic268Printer Operation268Data Control271Vertical Motion272Horizontal Motion278Overall Printing Style282Print Size and Character Width284Print Enhancement288Word Processing292Character Tables293User-defined Characters295Graphics297IBM Emulation Mode Commands Arranged by Topic300Commands That Duplicate Epson ESC/P Commands300Commands That Differ From EPSON ESC/P Commands301APPENDIX310Proportional Width Table311Character Tables315Italic Character Tables316Epson Extended Graphics Character Table317IBM Emulation Mode318INDEX331QUICK REFERENCE338Size: 4.65 MBPages: 346Language: EnglishOpen manual