Manuale UtenteSommarioIntroduction1WELCOME2HOW TO USE THIS USER GUIDE2ABOUT YOUR DISH ACCOUNT4WATCHING TV NOW5ADDITIONAL SERVICES7ABOUT SATELLITE TV RECEPTION7MOVING ON-SCREEN LOGO8Receiver & Remote Control11HOPPER HD DVR OVERVIEW12REMOTE CONTROL12HOPPER FRONT PANEL17HOPPER BACK PANEL17USING THE ON-SCREEN MENUS18USING TEXT FIELDS19Finding Programs to Watch21CHANGING CHANNELS22USING THE PROGRAM GUIDE22USING THE BROWSE BANNER24USING THEMES AND SEARCH24USING PICTURE-IN-PICTURE (HOPPER ONLY)26USING MULTI-CHANNEL RECALL26HOMES WITH A SECOND HOPPER INSTALLED28Pay-Per-Programs29PAY-PER-VIEW30DISH ON DEMAND30BLOCKBUSTER @HOME™31DISHONLINE.COM31ORDERING CONSIDERATIONS32Favorites Lists35WHAT ARE FAVORITES LISTS?36CREATING OR CHANGING FAVORITES LISTS36NAMING FAVORITES LISTS37USING FAVORITES LISTS37Parental Controls39WHAT ARE LOCKS AND RESTRICTIONS?40CREATING OR CHANGING A PASSWORD41COPYING LOCKS FROM YOUR HOPPER TO A JOEY41CREATING OR CHANGING RATINGS RESTRICTIONS42CREATING OR CHANGING CHANNEL LOCKS45HIDING ADULT CONTENT OR LOCKED CHANNELS45Multimedia and Apps47USING THE HOME MEDIA FEATURE48USING APPS ON YOUR HOPPER49MY ACCOUNT CUSTOMER SUPPORT49Digital Video Recordings51WHAT IS A DVR?52PAUSING A PROGRAM52REVERSE, FAST FORWARD, AND SKIP53SLOW MOTION AND FRAME-BY-FRAME53RECORDING A LIVE PROGRAM54PLAYING A RECORDED PROGRAM54OTHER RECORDING OPTIONS55GROUPING AND SORTING RECORDINGS56Recording Future Programs57USING PRIMETIME ANYTIME™58TIMERS AND RECORDINGS60USING THE TIMERS LIST63USING THE DAILY SCHEDULE63SETTING UP AN EVENT TIMER64SETTING UP A SEEK & RECORD™ TIMER64CHANGING OR DELETING A TIMER65Remote Control Setup67PAIRING YOUR REMOTE CONTROL68CONTROLLING OTHER COMPONENTS71THE LOCATE REMOTE FEATURE79SENDING DISCRETE POWER ON AND OFF80Receiver Customization83USING MULTIMEDIA84USING CALLER ID86CUSTOMIZING THE GUIDE AND CHANNEL LISTS87CHANGING LANGUAGES88USING CLOSED CAPTIONING88USING AUDIO OUTPUT89RESETTING TO FACTORY DEFAULTS91SCHEDULING RECEIVER UPDATES91USING TV EVERYWHERE91Connections and Setup97CONNECTING THE HOPPER HD DVR98CONNECTING THE JOEY RECEIVER(S)101CONNECTING TO YOUR DISH ANTENNA102CONNECTING THE PHONE LINE103CONNECTING TO BROADBAND INTERNET104USING TROUBLESHOOTING TOOLS105Reference108TROUBLESHOOTING TABLES109REMOTE CONTROL DEVICE CODES120Appendix122RESIDENTIAL CUSTOMER AGREEMENT125Index129FCC COMPLIANCE133Dimensioni: 7,65 MBPagine: 138Language: EnglishApri il manuale
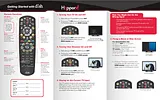
Guida UtenteSommarioHopper_UserGuideCover_FINAL_3.12.121HopperUG2Important Safety Instructions71 Read these instructions.72 Keep these instructions.73 Heed all warnings.74 Follow all instructions.75 Do not use this apparatus near water.76 Clean only with a dry cloth.77 Do not block any ventilation openings. Install in accordance with the manufacturer’s instructions.78 Do not install near any heat sources such as radiators, heat registers, stoves, or other apparatus (including amplifiers) that produce heat.79 Do not defeat the safety purpose of the polarized or grounding-type plug. A polarized plug has two blades with one wider than the other. A grounding-type plug has two blades and a third grounding prong. The wide blade or the third prong are provide...710 Protect the power cord from being walked on or pinched, particularly at plugs, convenience receptacles, and the point where they exit from the apparatus.711 Use only attachments/accessories specified by the manufacturer.712 Unplug this apparatus during lightning storms or when unused for long periods of time.713 Refer all servicing to qualified service personnel. Servicing is required when the apparatus has been damaged in any way, such as the power supply cord or plug is damaged, liquid has been spilled or objects have fallen into the apparatus, the appa...714 The power plug must be readily accessible so that the apparatus can be easily disconnected from the AC power.715 Tighten all of the coaxial cable connections only by hand. If you use a wrench, you may overtighten the connections and damage your equipment.716 The receiver is still connected to the AC power whenever it is plugged into a live power outlet, even if it is “turned off” (in standby mode) using a remote-control or front-panel POWER button.7Proper Care of Your Equipment8Introduction9• Welcome9• How to Use this User Guide9• About Your DISH Account9• Watching TV Now9• Additional Services9• About Satellite TV Reception9• Why Connect to a Phone Line or Broadband Internet? Internet9• Moving On-screen Logo9Welcome10How to Use this User Guide10Guide Overview10Guide Conventions11About Your DISH Account12Ordering Your Programming Packages121 Press POWER on the front panel to turn on the Hopper.122 Press System Info on the front panel to display the Hopper’s System Information menu on the nearby TV screen.123 Call 1-800-333-DISH (3474) and tell the Customer Service Center representative that the system has been installed and you would like to begin receiving services. A representative will explain the available DISH packages. Give the representative inf...124 The representative will send a signal via the satellite to activate your services. This process usually takes just a few minutes.125 If the System Information menu screen is still displayed, select Done.12Where to Find Information on Your Account12Watching TV Now13Finding a Program to Watch13Pausing Live TV14Recording and Playing Back a Program14Additional Services15Pay-Per-View15On Demand15DISH Online15About Satellite TV Reception15Rain and Snow Fade15Solar Interference16Why Connect to a Phone Line or Broadband Internet?16Moving On-screen Logo16Tips17Questions17Notes18Receiver & Remote Control19• Hopper HD DVR Overview19• Remote Control19• Hopper Front Panel19• Hopper Back Panel19• Using the On-screen Menus19• Using Text Fields19Hopper HD DVR Overview20Satellite Receiver20Remote Controls20Remote Control20Lost Your Remote?20Remote Control Batteries211 Press down on the dimple at the top of the battery cover on the back of the remote control and slide off the cover.212 Take out all four of the old batteries.213 Put in the new batteries. Make sure you match the plus (“+”) ends with the plus markings on the battery case.214 Slide the battery cover back into place on the back of the remote.21Low Battery Warning21Attach the Remote Control Antenna21Remote Control Buttons22SAT Mode Mode22TV Mode Mode23DVD Mode Mode24Hopper Front Panel25Hopper Back Panel25Using the On-screen Menus26Open and Close Menus26Highlighting Menu Options26Selecting Menu Options26List of Choices in the Menus26Canceling a Procedure27Using Text Fields27Using the On-screen Keyboard27Using the Number Pad27While in the Text Field28Questions28Tips28Finding Programs to Watch29• Changing Channels29• Using the Program Guide29• Using the Browse Banner29• Using Themes and Search29• Using Picture-In-Picture (Hopper only)29• Using Multi-channel Recall29• Starting in One Room and Finishing in Another29• Homes With a Second Hopper Installed29Changing Channels30Using the Up and Down Arrows30Entering a Channel Number30Using the Program Guide30Expanding and Collapsing Channel Ranges31Using the Browse Banner32Using Themes and Search32Using Themes33Using Predictive Search331 Press the SEARCH button on your remote control, or press the MENU button and select the Search tile from the Main Menu screen.332 Using the on-screen keyboard, start to type a title, actor’s name or keyword.333 Results of your search will start to be displayed as soon as you start typing. Typing more characters narrows the results.33Using Search History33Using Picture-In-Picture (Hopper only)341 Press the PIP button on your Hopper remote control to access the feature. By default, a small window showing the programming from a second Hopper tuner will be displayed. PIP Controls also will be displayed across the bottom of the screen on your n...342 You can use the on-screen controls to reposition or resize the PIP window, Swap the images in the main and PIP windows, or display them side by side on your TV screen. You can also choose to Close the PIP window, or select X to cancel out of the PI...343 Note that the POSITION and SWAP buttons on your Hopper remote perform the same functions as the on-screen PIP Controls for these two functions.34Using Multi-channel Recall341 Press the MENU button on your remote control and select the Settings tile.342 Select Guide Settings, and then Format Guide.343 Under Multi-Channel Recall, select one of the following options:344 When you are finished changing these settings, highlight and select the Save option. If you have made changes you do not want saved, press the remote CANCEL button.35Starting in One Room and Finishing in Another351 Press the pause button on your current receiver remote control and leave it behind.352 Go to another room with a connected Hopper HD DVR or Joey Receiver and pick up the DISH remote control for this location.353 Press the red button on the remote control to display the TV Viewing Status screen.354 From the TV Viewing Status screen, select the program you want to resume and continue watching from where you paused it.35Homes With a Second Hopper Installed361 Press the MENU button and select the Settings tile on the Main Menu screen.362 Select Network Setup, and then Whole-Home.363 Using the ARROW buttons, highlight and select the other Hopper in your home to link to it.364 Highlight and select the Save option when you have finished. Now you will see the DVR library on your newly linked Hopper when you press the DVR button. Repeat these steps to re-link to your original Hopper to access its DVR library.36Tips36Questions36• Pay-Per-View37• DISH On Demand37• Blockbuster @Home™37• DishOnline.com37• Ordering Considerations37Pay-Per-View38Ordering a Pay-Per-View Program38DISH On Demand38To Order a Movie or Program381 Press the DVR button to access the DISH On Demand menu screen.382 Select the option for the type of on-demand programming you wish to order. Select DISH Cinema, for example, to Explore or Search movies, see a list of New Releases, or view movies that you have rented. Select TV Shows to Explore or Search TV entert...383 Use the UP and DOWN ARROW buttons to scroll through the choices, if available.394 Highlight and select the movie, TV program, or on-demand event you want to watch.395 Select Rent.39Rental Considerations39Blockbuster @Home™39DishOnline.com39Use Considerations40Ordering Considerations40Tips40Questions41Notes42Pay-Per-Programs37Favorites Lists43• What are Favorites Lists?43• Creating or Changing Favorites Lists43• Naming Favorites Lists43• Using Favorites Lists43What are Favorites Lists?44Creating or Changing Favorites Lists44Naming Favorites Lists45Using Favorites Lists45Tips46Questions46• What are Locks and Restrictions?47• Copying Locks from Your Hopper to a Joey47• Creating or Changing a Password47• Creating or Changing Ratings Restrictions47• Creating or Changing Channel Locks47• Hiding Adult Content or Locked Channels47What are Locks and Restrictions?481 Create the parental-control locks that you want. Available types of locks are:482 Set a password. When you have set locks and restrictions, the receiver is locked, and anyone who wants to access locked items must enter the password each time they do so.48Creating or Changing a Password491 Press the Menu button, select the Settings tile, and then select Parental Controls.492 If the receiver is locked, enter the password using the remote control’s number pad. The receiver displays stars (*) as you enter the digits of your password. Then select OK.493 If you are changing an existing password, select Edit Password. If you are creating a new password for the first time, you will be prompted for the password after setting controls. If you want to erase the current password, you will need to enter i...494 Enter the current password using the remote control’s NUMBER PAD.495 Enter the new password using the remote control’s NUMBER PAD.496 Enter the new password again for confirmation, also using the number pad. The receiver displays stars (*) as you enter the digits of the password.497 Memorize your new password. From now on, enter this password to lock or unlock the receiver. If you forget the password, you will need to call DISH Customer Service.49Copying Locks from Your Hopper to a Joey491 Press the MENU button on your remote and select the Settings tile on the Main Menu.492 Select Parental Controls, and then highlight and select the option to Copy Settings.493 In the pop-up Location List, select each location to which you want to copy the Hopper’s settings for Parental Controls. A check mark appears next to each selected location.494 You can select a location again to uncheck it, highlight and select the Cancel option to ignore and start over, or when finished selecting locations, select OK to initiate copying.49Creating or Changing Ratings Restrictions501 Press the Menu button, select the Settings tile, and then select Parental Controls.502 If the receiver is locked, enter the password using the remote control’s number pad. The receiver displays stars (*) as you enter the digits of the password.503 To create or change parental controls based on program ratings, select Edit Ratings.504 Highlight the least restrictive rating that you want to block. Press Select to lock the highlighted rating and all ratings that are more restrictive than it (for example, locking the PG-13 rating automatically locks R, NC-17 and NR/AO ratings).505 Select the expanded rating code(s), if you want to also lock these program ratings.526 To unlock a rating code, select the code again.527 Select Save. To ensure new parental controls take effect, you will need to set a password if you have not already. See the instructions for creating a new password on page 41.53Creating or Changing Channel Locks531 Press the Menu button, select the Settings tile, and then Parental Controls.532 If the receiver is locked, enter the password using the remote control NUMBER PAD. The receiver displays stars (*) as you enter the digits of the password.533 To create or change parental controls for specific channels, select Lock Channels.534 Highlight and select each channel that you want to lock or unlock. Press the Arrow buttons to navigate to each channel, and then SELECT it. You can also move the list of channels by entering a number using the remote control NUMBER PAD. If the chec...535 You can choose to view only the channels you have selected to be locked, and you can choose to hide the locked channels so they are not displayed in the Program Guide. (You can still enter the number of a locked channel directly using the remote NU...536 Select Save.53Hiding Adult Content or Locked Channels531 Press the Menu button, select the Settings tile, and then Parental Controls.542 If the receiver is locked, enter the password using the remote control NUMBER PAD. The receiver displays stars (*) as you enter the digits of the password.543 Select the option to Lock Channels.544 Select Yes under Hide Adult Channels.545 Select Save.54Tips54Questions54Parental Controls47Multimedia and Apps55• Using the Home Media Feature55• Using Apps on Your Hopper55• My Account/Customer Support55Using the Home Media Feature561 Ensure your Hopper is connected to your local area network (LAN) and has been assigned a valid IP address562 Have compatible media server software running on a device connected to the same LAN as your Hopper563 Confirm access to the media server is not blocked by a firewall or security software564 Select the Device List item from the drop–down menu on the Home Media screen and refresh the list565 Optionally, you can select the Settings item from the drop–down menu to change the defaults for playing slideshows and/or audio.56Using Apps on Your Hopper57My Account/Customer Support57Tips57Notes58Digital Video Recordings59• What is a DVR?59• Pausing a Program59• Reverse, Fast Forward, and Skip59• Slow Motion and Frame-By-Frame59• Recording a Live Program59• Playing a Recorded Program59• Recording While Watching Different Programs59• Other Recording Options59• Grouping and Sorting Recordings59What is a DVR?60Pausing a Program60Reverse, Fast Forward, and Skip61Slow Motion and Frame-By-Frame61Recording a Live Program62Playing a Recorded Program621 Press the DVR button on your remote control to display the My Recordings screen.622 Highlight a tile for a program (or folder of programs, if applicable). If you want to watch the program (or the latest recording in a folder of programs), then press the PLAY button. If you want to see more options, press the SELECT button to show ...623 For a single program or event, choose from the following options:62Recording While Watching Different Programs63Recording a Different Program631 Make sure your Hopper HD DVR is powered on by the indicator light on the front panel.632 Press Guide to access the Program Guide. Find a program on now you want to record.633 Highlight and press the Select button to tune the receiver to that program.634 Press the Record button on your remote control.635 Select OK to begin recording now with your default DVR recording settings, or Options to customize your recording settings.636 If you selected Options, see Other Recording Options on page 55 for more on your choices.637 Choose another program to record, as described in Step 2.638 Press the Record button on your remote control and select OK when the pop-up screen displays. You are now recording two programs at the same time.639 Press DVR twice on the remote control to access the My Recordings screen. You should see the two programs that are recording indicated by the red dots next to the listings.6310 Select another program to watch, if applicable, or an event that you recorded earlier and start the playback.6311 You should now be watching one program or event while the receiver is also recording the other two programs or events.63Other Recording Options63Grouping and Sorting Recordings641 Press the DVR button (or press MENU, and then select DVR).642 Choose a group or sort option to help you quickly find the program you want to watch:64Tips64Questions64Recording Future Programs65• Using PrimeTime Anytime™65• Timers and Recordings65• Using the Timers List65• Using the Daily Schedule65• Setting Up an Event Timer65• Setting Up a Seek & Record™ Timer65• Changing or Deleting a Timer65Using PrimeTime Anytime™66Enabling the PrimeTime Anytime™ feature661 Press the MENU button on your DISH remote control, highlight the PrimeTime Anytime tile and press SELECT.662 Select the Enable option to turn on the feature, then highlight and select Save.663 If you Enabled the feature, it will begin recording HD prime-time shows each night. Note that Enabling the feature does not instantly populate the folder with content; recordings will begin during the next applicable nightly interval and gradually ...66Disabling the PrimeTime Anytime™ feature661 Press the MENU button on your DISH remote control, highlight the Settings tile on the Main Menu screen and press SELECT.662 Highlight and select DVR Defaults and then select PrimeTime Anytime.663 Select the Disable option to turn off the feature, then highlight and select Save.66Accessing PrimeTime Anytime™ content67Saving and Deleting PrimeTime Anytime™ content67Timers and Recordings68Timer Types68Timer Frequency68Timer Priorities68Timer Options69Daily Schedule69Timers List69Reasons Why Timers are Skipped70When a Timer Needs Your Tuner to Record70When the Receiver is Off70Special Considerations When Using Timers71Using the Timers List711 Press the DVR button on your remote control four times to display the Timers List.712 Scroll the list of timers. As you do so, detailed information about the highlighted timer appears on the right. From the drop-down menu bar, you choose to sort the list by Priority or select multiple Timers to edit at once (for example, to change P...71Using the Daily Schedule711 Press the DVR button on your remote control three times to display the Daily Schedule.712 Scroll the list of timers for today and the next few days. As you do so, detailed information about the highlighted timer appears on the right. You Show or Hide events to be skipped.71Setting Up an Event Timer721 Find a program or event to record that starts in the future using the Program Guide or Browse Banner.722 Highlight and select the future program or event. The Create Timer screen displays.723 Select one of the Timer Types (see page 60 for more details).724 Select the Timer Frequency (see page 60 for more details).725 Select any other recording Options (see page 61 for more details), as applicable.726 Select Priority if you would like to change the current priority of the event timer (see page 60 for more details).727 Select Create to save the new event timer.72Setting Up a Seek & Record™ Timer721 Press your remote’s Search button. If you need to, clear or delete the text in the box.722 Select Seek & Record.723 Select your preferred Search Method:724 Enter your search criteria. You can use the virtual on-screen keyboard below the text box, or you can use the letters above the Number Pad buttons on the remote control (similar to texting on many mobile phones) while the on-screen cursor is in the...735 Select any Options for the Seek & Record timers, as described on page 61, if applicable.736 Select Create. When the receiver has completed your search, the Timers list and Daily Schedule screens will display the results.73Changing or Deleting a Timer731 Press the DVR button three times for the Daily Schedule or four times for the Timers list.732 Highlight a program or event in the list and press the SELECT button.733 Select Skip Event if you wish to skip the selected occurrence of the event timer; Edit Event. if you wish to change recording options for this occurrence only; or Edit Timer if you wish to change or delete all occurrences of this timer from the list.734 Select Delete. A pop-up window asks you to confirm your choice(s).735 Select Yes on the pop-up screen. The timer(s) you selected are now deleted.73Tips73Questions74Remote Control Setup75• Pairing Your Remote Control75• Controlling Other Components75• Setting Up by Learning from Another Remote75• Controlling a Tuner or Amplifier75• The Locate Remote feature75• Sending Discrete Power On and Off75• Tips75• Questions75Pairing Your Remote Control76To pair your remote control761 Make sure the remote control has fresh batteries installed and is in Sat mode.762 Press the System Info button on the receiver front panel to display the System Information screen on the nearby TV.763 Press and release the SAT button on the remote control:764 Select Close to close the System Information screen.76Adjusting the Remote Control Antenna77Installing a UHF Attenuator781 Remove the remote control antenna from the Remote Antenna input on the receiver’s back panel.782 Attach a 10 dB attenuator directly to the Remote Antenna input.783 Attach the remote control antenna to the newly installed attenuator.78Controlling Other Components79Remote Control Modes79Setting Up Using the Remote Manager791 Press MENU, highlight and select the Settings tile, and then Remote Manager.792 Highlight and select the option for the device mode you want to program:793 Highlight and select Save when you are finished.79Limited Mode79Turning Limited Mode On and Off801 Press MENU, highlight and select the Settings tile, and then Remote Manager.802 Highlight and select the option for Limited Mode:803 Highlight and select Save when you are finished.80Combination Devices80Setting Up Using Device Code Tables801 Turn the device on.802 Find the brand name of the device in the tables in Remote Manager.803 Press and hold the mode button until all the other mode buttons light up, then release the button. The mode button flashes.804 For Aux mode only. Press 0 for a TV, 1 for a VCR, or 2 for a tuner or amplifier.805 Enter one of the three-digit device codes from the table using the NUMBER buttons.816 If you want to program Limited Mode, press 1. If not, skip to step 7.817 Press the Pound (#) button.818 Press Power to turn off the device. If the device does not turn off, go to step 10.819 Turn the device back on and try some other buttons to make sure they work. If the code works for other buttons, you can stop here.8110 If the code doesn’t work, repeat steps 3 through 9 with another device code from the tables.8111 If you can’t find a code that works, then try Setting Up Using Device Codes Scan on page 73.81Setting Up Using Device Codes Scan811 Turn the device on.812 Press and hold the mode button until all the other mode buttons light up, and then release the button. The device mode button flashes.813 For Aux mode only. Press 0 for TV, 1 for VCR, or 2 for an audio tuner or amplifier. Then press the Star (*) button.824 Press the remote’s Power button.825 Press the Up or Down arrow repeatedly until the device turns off.826 Press the Pound (#) button.827 Turn the device back on and try some other buttons to make sure that they work also.828 If necessary, repeat this procedure until you’ve tried all the different codes and chosen the one that works best with your device.82Checking the Device Codes821 Press and hold the mode button until all the other mode buttons light up, and then release the button. The device mode button flashes.822 Press the Pound (#) button twice. Watch the mode light to determine your code. The mode button flashes the number for each digit of the device code, with a pause between the groups of flashes. A quick flash is for zero (0).83Setting Up by Learning from Another Remote841 You can follow the instructions for using device codes to program a specific mode, and then learn commands that add new or overwrite existing functions of the remote control’s buttons in this mode. For this type of learning, any remote control bu...842 Each button on this remote control can learn a command from the equipment’s original remote control. For this type of learning, any remote control button without a learned command will have no function for that programmed device.841 Ensure the the desired remote address is programmed to the DISH remote.842 Place both your DISH remote and the original equipment’s remote control on a flat, stable surface.843 On the DISH remote, press and hold the mode button for your equipment for about three seconds until all the mode buttons light up, and then release it.844 To start learning commands for this mode:855 Point the front of the original device remote to face the small square (IR window) on the front, left-hand side of the DISH remote control, as shown on page 76.856 On the DISH remote control, press the button you want to teach.857 On the original device’s remote control, press and hold the button for the command that you want learned.858 After a button has learned a command successfully, repeat step 6 and step 7 until all commands you want have been learned.859 To end the learning sequence:85Controlling a Tuner or Amplifier86AUX Mode Mode86Switching Between TV and Tuner/Amplifier Volume Adjustment86Programming to Control a Second Satellite Receiver87The Locate Remote feature87Sending Discrete Power On and Off88Tips88Questions88• Using Multimedia89• Using Caller ID89• Customizing the Guide and Channel Lists89• Changing Languages89• Using Closed Captioning89• Using Audio Output89• Resetting to Factory Defaults89• Scheduling Receiver Updates89• Using TV Everywhere89Using Multimedia90Photos90External Hard-Disk Drive901 Purchase a USB 2.0 hard-disk drive from a consumer electronics retailer.912 Connect the drive to one of the receiver’s three USB ports, making sure to follow any connection instructions that came with the hard-disk drive. Note: Currently, the receiver supports having one USB device connected at a time. If you have a seco...913 If the hard-disk drive is compatible, you’ll see a pop-up message screen confirming the device’s connection and asking if you want to manage its contents. Select Yes.914 Follow the on-screen prompts.915 Once the external device is recognized, you’ll see a pop-up message asking if you want to format the drive—formatting is necessary to store your recorded programs on the external hard-disk drive. Note that selecting Yes will cause anything stor...916 Press the MENU button and then highlight and select the Recordings Transfer tile to transfer DVR content from your Hopper HD DVR to your external hard drive.91Using Caller ID91Setting Up Caller ID Display911 Press the MENU button, highlight and select the Settings tile from the Main Menu screen.912 Highlight and select Network Setup, and then Caller ID.913 Select Enable or Disable for this feature, then select the option to Save..92Caller ID Screens92Using Caller ID History931 Press the MENU button on your remote control.932 Scroll down to highlight the Caller ID History tile and then press the SELECT button.933 From the Caller ID History screen, you can view Call History entries, highlight and delete a row for an entry, or clear the entire list of entries.934 Press Save when you are finished.93Customizing the Guide and Channel Lists931 Press the MENU button, highlight and select the Settings tile on the Main Menu screen.932 Highlight and select Guide Settings, and then Format Guide.933 Change the Channel Order and Preference, as needed, and then select the Save option.93Changing the Guide Display94Changing Languages941 Press MENU and highlight and select the Settings tile on the Main Menu screen.942 Highlight and select Audio, then Alternate Audio.943 Select the audio language you want from the list, and then select the option to Save.94Using Closed Captioning94Using Audio Output951 Press the MENU button and select the Settings tile from the Main Menu screen.952 Highlight and select the Audio tile, and then select Audio Output.953 From this screen, you can select your external digital-audio signal decoder’s capabilities (for example, if your audio equipment supports decoding Dolby® Digital soundtracks), as well as whether to enable the volume-leveling feature provided by ...95Resetting to Factory Defaults971 Press the Menu button, select System Setup, and then Factory Defaults. The receiver displays a Warning message to confirm that you want to reset the receiver’s preferences.972 Select Yes.97Scheduling Receiver Updates97Using TV Everywhere971 Connect your Hopper to broadband Internet. See “Connecting to Broadband Internet” on page 100. You can verify your connection on the Broadband screen in Network Settings.972 Plug in the Sling Adapter to a free USB port on your Hopper.973 Log into dishonline.com on your computer, or download and install our free DISH Remote Access mobile app for your smartphone or tablet.974 Enjoy watching your live TV and recordings from your DVR wherever you go!97Tips98Questions98Receiver Customization89• Connecting the Hopper HD DVR99• Connecting the Joey Receiver(s)99• Connecting to Your Dish Antenna99• Connecting the Phone Line99• Connecting to Broadband Internet99• Using Troubleshooting Tools99Connecting the Hopper HD DVR100HDMI Connections1001 Connect an HDMI cable between the HDMI connection on the DISH receiver and HDTV set or HD monitor.1002 Turn on your Hopper HD DVR or Joey Receiver and the connected TV/monitor using the front panel buttons.1003 Confirm that you are getting a picture from the DISH receiver. Consult your HDTV user’s guide if you need to change your HDTV to display from the correct Digital Audio/Video input.1004 If you do not see a picture, see No Picture on TV Connected to Hopper on page 95.1005 Turn up the volume on your HDTV and confirm you have sound. If you don’t have sound, your system may require you to connect stereo audio (red and white) RCA-type cables between the receiver’s analog audio outputs and your system’s audio input...100YPbPr Connections (Hopper only)1011 Connect between the YPbPr component video connections on the Hopper HD DVR and the nearby TV using component (usually red/green/blue) video cables.1012 Connect audio (red and white) RCA-type cables between the Hopper Audio Outputs and audio input connections that go with the YPbPr connectors on your HDTV or monitor.1013 If you do not see a picture yet, change the resolution setting on the Hopper. Use the steps below and Setting Up to Display in HD on page 96.1014 Turn up the volume on your HDTV and confirm that you hear sound. Check the audio cable connections if you don’t hear sound.101No Picture on TV Connected to Hopper1011 Connect the three RCA-type cable connections (yellow for video and red/white for audio) between the receiver outputs and the nearby TV.1012 Make sure that both the receiver and nearby TV are turned on (not in standby or power- saving mode).1013 Make sure the nearby TV is set to view the RCA-type audio/video inputs or source. Look on the back of your HDTV or consult your HDTV user’s guide for more information.1014 Change the receiver’s HDTV settings, as described on page 96.1015 Switch to the nearby TV to display from the HD inputs (HDMI or component video) that you selected in the previous sections. If you have a picture on the TV, you are finished.1016 Repeat steps 4 and 5 until the nearby TV displays a video image from Hopper.101Setting Up to Display in HD1021 Consult your HDTV user’s guide for the best HD-format resolution that the TV supports (typically, this is either 1080i/1080p or 720p).1022 Press the MENU button, select the Settings tile, then select Format TV, and then HDTV.1023 Select the TV Type that matches the high-definition resolution that your TV supports.1024 Also from this screen, you can select the Aspect Ratio option that matches your TV:1025 When you are finished, highlight and select the Save option.1026 If required, set up your HDTV to display in the best format. If you are connected using an HDMI cable, some HDTVs will automatically adjust the resolution setting to the receiver.102Connecting the Joey Receiver(s)1031 Connect the Home Video Network output on the back of the Hopper HD DVR to an existing wall cable outlet using a coaxial cable.1032 Connect the Joey Receiver(s) in other room(s) to existing wall cable outlet(s) using coaxial cable(s).1033 Connect the Joey Receiver(s) to an audio/video input of the remote TV in each room.1034 Turn on every Joey Receiver and remote TV connected to the in-home cabling system. If you have not already done so, you may need to pair a remote control to each Joey.1035 Follow the on-screen prompts or included instructions for linking each Joey Receiver to your Hopper HD DVR. (The Hopper is the host for DISH Whole-Home DVR services.)1036 Confirm that you see a picture from your Joey Receiver(s) on your remote TV(s).103Connecting to Your Dish Antenna1041 Before you can begin connecting your Hopper HD DVR to your dish antenna, you must first complete the preceding sections for connecting your TVs to the receiver.1042 Connect two RG-6 coaxial cables between the Satellite In 1 and Satellite In 2 ports on the receiver’s back panel to two available ports on either the switch, DISH Pro Plus Separator, or LNBF in your existing satellite system.1043 Peel off the blue stickers and affix them to the cables close to where they connect to the Satellite In 1 and Satellite In 2 connections on the back of the receiver. The stickers are inside the front cover of this guide.1044 On a paired remote control, press the MENU button, highlight and select the Settings tile, then Diagnostics, and then Point Dish to display the Point Dish screen on the nearby TV.1045 When directed to do so by DISH instructions, select Check Switch. Then select Test.1046 The receiver begins performing the Check Switch tests. See Point Dish and Check Switch on page 102. When it is finished, the Installation Summary screen is displayed.1047 Make sure the information on the Installation Summary screen identifies your system correctly, showing all transponders and satellites applicable to your system. (For example, to display nine days of guide data, you must receive either the 119°W o...1048 Select Close.1049 Select Close to exit the Point Dish screen. At this point, the receiver may walk you through a procedure to download software. If this prompt displays, follow the instructions and do not disturb the receiver until the nearby TV displays live TV fro...104Connecting the Phone Line105Phone Line Connection105Phone System Setup1061 Press Menu button, select the Settings tile, then Network Setup, and then Phone Line.1062 Select the Touch Phone or the Rotary Phone option under Phone Type.1063 Select either the No Prefix or the Prefix Code option under Outside Line.1064 If you selected No Prefix, then select Save.1065 If you selected Prefix Code, the receiver highlights the box where you must enter the exact sequence used when dialing via an outside line. Use the on-screen number pad.1066 If you haven’t already, now select the option to Save.106Connecting to Broadband Internet106Using Troubleshooting Tools107Running System Wizard1071 Press and hold the System Wizard (number 0) button on your remote control until the SAT mode light blinks.1072 When the SAT mode light goes out, release the System Wizard button.107Resetting Your Receiver1071 Press the red RESET button behind the door on the front panel of the receiver.1072 The receiver’s front-panel lights will blink and the receiver will restart.107Receiver Tests1071 Press the Menu button, select the Settings tile, then Network Setup, and then Tests. The Network Setup Tests screen contains various tests that a DISH Customer Service Representative may ask you to initiate for your receiver:1072 Select Close.107Point Dish and Check Switch1081 Press the Menu button, highlight and select the Settings tile on the Main Menu screen.1082 Highlight and select Diagnostics, and then Point Dish.1083 This screen shows you information to help maximize your satellite signal. The bar at the bottom of the screen indicates the signal strength. Green shows a good signal, yellow is a marginal signal, and red indicates the signal is not acceptable or i...1084 Do not run a Check Switch test unless directed to do so when speaking to a Customer Service Representative or DISH technician.108Connections and Setup99Remote Control Device Codes121• Troubleshooting Tables109• Remote Control Device Codes109Troubleshooting Tables1101 Review the section in this Guide that relates to the problem.1102 If you cannot find a solution, then find the section in the following tables that relates to the problem.1103 Sometimes resetting the receiver can fix a minor problem. See Resetting Your Receiver on page 101.1104 Make sure your TV is tuned to the correct channel or input/source to view satellite TV programs.1105 Make sure your remote control has fresh batteries installed. If you see the Remote Battery Low warning on your TV screen, it’s time to change the batteries. See the instructions on page 13.1106 Make sure that your receiver is connected to an active telephone line or home network with broadband Internet access. See more information and instructions on page 100.1107 Check for anything that might be blocking the dish antenna’s view of the sky, such as tree branches or accumulated snow.1108 For more information, call the DISH Customer Service Center at 1-800-333-DISH (3474), or visit the www.dish.com website, or www.mydish.com/support online for technical support information.110Message Numbers111Changing Channels113Remote Control113Program Guide or the Browse Banner114Watching a Program115Favorites Lists116Timers116Hearing a Program118Caller ID118Telephone for Voice/Data/FAX118Locks119Buying a Pay-Per-View Program119Menus120Reference109Appendix123• Limited Warranty123• Residential Customer Agreement123• FCC Compliance123Limited Warranty124What the Warranty Covers124What the Warranty Does Not Cover124Legal Limitations124If You Need Assistance124DISH Network’s Exchange Programs125Advance Exchange Program125Post Receipt Exchange Program125Accessory Warranty125Residential Customer Agreement126Phone: 800-333-DISH (3474)126Email: care@dish.com126Mail: DISH NETWORK CUSTOMER SERVICE CENTER126P.O. BOX 9033126LITTLETON, CO 80160126Website: dish.com126FCC Compliance134Telephone Communication134Compliance Information Statement134Signal Strength Present at the Television134Dimensioni: 11,7 MBPagine: 138Language: EnglishApri il manuale