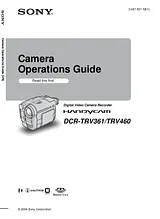
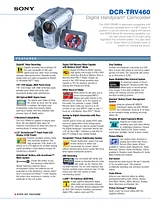
ユーザーズマニュアル目次Read this first2Quick Start Guide8Recording movies8Recording still images10Recording/Playing back with ease12Getting started13Step 1: Checking supplied items13Step 2: Charging the battery pack14Using an outside power source17Step 3: Turning the power on17Step 4: Adjusting the LCD panel and viewfinder18Adjusting the LCD panel18Adjusting the viewfinder18Step 5: Setting the date and time19Step 6: Inserting the recording media20Inserting a cassette tape20Inserting a “Memory Stick”21Step 7: Setting the screen language22Recording24Recording movies24Recording for a longer time26Using zoom26Using the built-in light27Recording in mirror mode28Using the self-timer28Recording still images – Memory photo recording29Selecting image quality31Using the self-timer31Recording a still image on a “Memory Stick” while recording movies on a tape32Recording with ease – Easy Handycam33Recording a movie33Recording a still image34Making full use of Easy Handycam operation34Adjusting the exposure35Adjusting the exposure for backlit subjects35Fixing the exposure for the selected subject – Flexible spot meter35Adjusting the exposure manually36Recording in dark places – NightShot plus, etc.37Adjusting the focus38Adjusting the focus for an off- center subject – SPOT FOCUS38Adjusting the focus manually39Recording a picture using various effects40Fading in and out of a scene – FADER40Using special effects – Digital effect41Overlaying still images on movies on a tape – MEMORY MIX43Searching for the starting point44Searching for the last scene of the most recent recording – END SEARCH44Searching manually – EDIT SEARCH45Reviewing the most recently recorded scenes – Rec review45Playback46Viewing movies recorded on a tape46Playing back in various modes47Viewing recordings with added effects – Digital effect48Viewing recordings on a “Memory Stick”49Playing back in various modes from a “Memory Stick”50Playing back with ease – Easy Handycam51Making full use of Easy Handycam operation52Various playback functions53Magnifying pictures – Tape playback zoom/Memory playback zoom53Displaying the screen indicators54Displaying the date/time and camera settings data – Data code54Playing the picture on a TV56Locating a scene on a tape for playback57Searching quickly for a desired scene – Zero set memory57Searching for a scene by date of recording – Date search57Using the Menu59Selecting menu items59Using the (CAMERA SET) menu – PROGRAM AE/16:9 WIDE, etc.61Using the (MEMORY SET) menu – QUALITY/IMAGE SIZE/ALL ERASE/NEW FOLDER, etc.65Using the (PICT. APPLI.) menu – PICT. EFFECT/SLIDE SHOW/FRAME REC/ INTERVAL REC, etc.68Using the (EDIT/ PLAY) menu – END SEARCH/ TITLE, etc.73Using the (STANDARD SET) menu – REC MODE/MULTI- SOUND/AUDIO MIX/USB-CAMERA, etc.76Using the (TIME/ LANGU.) menu – CLOCK SET/ WORLD TIME, etc.82Customizing Personal Menu83Dubbing/Editing86Connecting to a VCR or TV86Dubbing to another tape87Recording pictures from a VCR or TV88Dubbing pictures from a tape to a “Memory Stick”89Dubbing still images from a “Memory Stick” to a tape90Dubbing selected scenes from a tape – Digital program editing91Deleting recorded pictures98Marking recorded images with specific information – Image protection/Print mark99Printing recorded images (PictBridge compliant printer)101Connecting your camcorder to the printer101Printing101Troubleshooting103Troubleshooting103Warning indicators and messages110Additional Information114Using your camcorder abroad114Usable cassette tapes115About the “Memory Stick”116About the “InfoLITHIUM” battery pack118About i.LINK119Maintenance and precautions120Specification123Quick Reference126Identifying parts and controls126Index132サイズ: 3.88MBページ数: 136Language: Englishマニュアルを開く