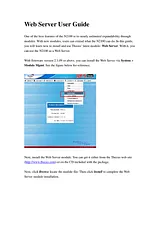
Листовка (N2100_2050)СодержаниеWeb Server User Guide1One of the best features of the N2100 is its nearly unlimited expandability through modules. With new modules, users can extend what the N2100 can do. In this guide, you will learn now to install and use Thecus’ latest module: Web Server. With it, you can use the N2100 as a Web Server.1With firmware version 2.1.09 or above, you can install the Web Server via System > Module Mgmt. See the figure below for reference.1Next, install the Web Server module. You can get it either from the Thecus web site (http://www.thecus.com) or on the CD included with the package.1Next, click Browse locate the module file. Then click Install to complete the Web Server module installation.1Once installation is successful, the module will be displayed in the Module Management window:2To activate the Web Server module, tick the check box and then click Enable. See the figure below for reference:2The figure below shows the status of Web Server module after installation:3Setting up the Web Server function can be performed either via the module management UI or through the Main Menu under the Network category if the Web Server module is set to “Enable”. If the Web Server module set to “Disable”, then it won’t appear in the Main Menu. Please refer the figure below:3After the Web Server module is executed, you will see the Web Server window appear as below:4The Web Server will use the following settings by default:41. Port usage: 8152. System share folder: naswebsite (Please refer to the screenshot below)53. Subfolders of the system share folder: “conf”, “logs” and “www”.54. Default Web Server User: nobody.55. Default Web Server User Priviliges: Public5To start the Web Server service, simply click Start on the Web Server window. You can refer the screen shot below for details.5In the above diagram, the Web Server has started with the default user “nobody” with “Public” privileges as mentioned earlier. This means that anyone can access the Web Server system folder “naswebsite”, its subfolders, and files. As this is potentially a serious security threat, we strongly suggest that all users are properly configured with ACL privileges.6To do this, you may change “naswebsite” system folder status from “Public” to “ACL” by navigating to Storage > Folder from the Main Menu. Then, assign user(s) with read/write privileges for the “naswebsite” system folder.6After you have done this, you need to modify “httpd.conf” file, which is located at \\naswebsite\conf\httpd.conf. The “User nobody” needs to be changed to a user you have assigned for “naswebsite” system folder . For example, if “david” is a user with read/write privileges for the “naswebsite” system folder, you can change “User nobody” to “User David”. Please refer the screenshot below for reference.6You may also like to change Web Server port number from the default 81 to another. Once again, you can change it from “httpd.conf” file. See the screenshot below.6Please always stop the web server service before making any modifications to the “httpd.conf” file. After completing your modifications, restart the web server to activate service. Do not make any changes to the “httpd.conf” file while the web server is running or it could cause unexpected errors7To verify that the “httpd.conf” file has been correctly modified, click the Test button from Web Server window to have the system check the syntax of the configuration file and report its status.7PHP v5.0.5 and SQL-Lite v2.8.14 Web Server Support7You may also have PHP and SQL-Lite work together with this Web Server module.7Below is an example of how to have your PHP program retrieve SQL lite supported information.7Create a file named phpinfo.php, and place this file under the \\<NAS-IP>\naswebsite\www directory. The phpinfo.php should contain the following:7<?php phpinfo();?>7Then, you can get information from the currently supported SQL Lite version by using the URL: http://Web_Server_IP:81/phpinfo.php.7Размер: 666,0 КБСтраницы: 8Язык: EnglishПросмотреть
Листовка (N2100_2050)СодержаниеChapitre 1. Introduction6Contenu du Paquet 6Présentation du Matériel7Installation du Disque Dur1119Assistant d’Installation20Chapitre 2. Gestion du Système29Connexion à la Gestion Web du Système2929Vérifier l'Etat du Système31Configurer les Disques Durs et les Dossiers de Fichiers41Configurer les Paramètres Réseau59Gestion des Utilisateurs et des Groupes75Paramètres Complémentaires du Système82Sélection de la Langue100Chapitre 3. Comment Utiliser le YES Box N2100102Gérer les Fichiers et les Dossiers103Configuration Disque Web104Configuration du Serveur iTunes®106Configuration de Galerie Photos108Extension de Stockage USB112Mapper le Client PC sur le YES Box N2100112116Sauvegarde de Fichier119Appendice A : Guide de Dépannage122Adresse IP ou Mot de Passe Oubliés122Détection d'Erreur122Résoudre les Problèmes123Appendice B: Les Bases du Système RAID126Présentation du Système RAID126Avantages126Configuration RAID127Размер: 3,8 МБСтраницы: 151Язык: FrançaisПросмотреть