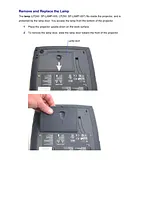
BenutzerhandbuchInhaltsverzeichnisIntroduction61 Required computer connections72 Optional computer connections73 Displaying a computer image84 Using the projector with Windows 98 for the first time95 Adjusting the image101 Standard video connections112 Optional video connections113 Displaying a video image12Shutting down the projector14Troubleshooting your setup14Table 1: LED behavior and meaning14Using the remote control22Using the audio23Using the keypad buttons23Optimizing computer images24Presentation features24Optimizing video images25Customizing the projector25Using the menus26Picture menu27Settings menu30Maintenance33Cleaning the Lens331. Apply a non-abrasive camera lens cleaner to a soft, dry cloth.332. Lightly wipe the cleaning cloth over the lens in a circular motion. If you don’t intend to use...33Cleaning the Dust Filter331. Turn off the projector and unplug the power cord.332. Turn the projector upside down, loosen the screw on the filter, then gently pry the filter up.333. Clean the filter using a vacuum cleaner on low power.334. Replace the filter and tighten the screw.33Replacing the Projection Lamp341. Turn off the projector and unplug the power cord.342. Wait 60 minutes to allow the projector to cool thoroughly.343. Turn the projector upside down and remove the lamp door by pushing the tab forward (toward the...344. Loosen the three captive screws on the lamp housing.345. Carefully remove the lamp housing. Dispose of the lamp in an environmentally proper manner.356. Install the new lamp housing and tighten the screws.357. Replace the lamp door.358. Plug in the power cord, press the power button to turn the projector back on.359. To reset the lamp hour timer, navigate to the Settings>Service menu and select Reset Lamp. See...35Cleaning the Lamp Housing Screens351 Remove the lamp module.352 Examine the dust filter screens in the lamp housing area. If necessary, use a vacuum cleaner se...353 Replace the lamp module and lamp door.35Appendix36Table 2: Range of distance to the screen for a given screen size for LP24037Table 3: Range of distance to the screen for a given screen size for LP25037Größe: 2,21 MBSeiten: 39Language: EnglishHandbuch öffnen
VerweisanleitungInhaltsverzeichnisIntroduction5Connecting a computer6Required computer connections6Displaying a computer image7Using the projector with Windows 98 for the first time8Adjusting the image9Connecting a video device10Standard video connections10Displaying a video image11Shutting down the projector13Troubleshooting your setup13Using the remote control21Using the audio22Using the keypad buttons22Optimizing computer images23Presentation features23Optimizing video images24Customizing the projector24Using the menus25Picture menu26Settings menu29Maintenance33Cleaning the lens33Cleaning the dust filter33Replacing the projection lamp34Cleaning the lamp housing screens36Using the security lock36Appendix37Specifications37Accessories37Projected image size38Index39Größe: 3,4 MBSeiten: 44Language: EnglishHandbuch öffnen