User ManualTable of ContentsFRONT MATTER1Printer Parts3Control Panel Buttons and Lights4CONTENTS5GETTING TO KNOW YOUR PRINTER11Features12Available Paper Paths13Options17Ribbon Cartridges17Important Safety Instructions18Print Head Caution Symbol19Compliance20For United Kingdom Users20How To Use Your Manuals21Warnings, Cautions, and Notes22CHAP 1-SETTING UP THE PRINTER23Unpacking the Printer24Choosing a Place for the Printer25Positioning the continuous paper supply26Installing or Replacing the Ribbon Cartridge27Plugging in the Printer32Connecting the Printer to Your Computer33Installing the Printer Driver on Your PC35For Windows 95 or NT 4.035For Windows 3.1 or NT 3.5x38Optional Printer Drivers for DOS Program Users40CHAP 2-USING THE PRINTER SOFTWARE41About Your Printer Software42Using the Printer Driver With Windows 9543Using the Printer Driver With Windows 3.148Using the Printer Driver With Windows NT 4. 051Using the Printer Driver With Windows NT 3. 5x56Using the EPSON Remote! Utility61CHAP 3-PRINTING ON CONTINUOUS PAPER62Setting the Paper Release Lever63Setting the Paper Thickness Lever64Loading Multi- Part Forms65Loading Continuous Paper With Labels65Removing Continuous Paper with Labels66Using the Tractor in the Front Push Position67Installing the Tractor in the Front Push Position67Loading Paper With the Front Push Tractor69Removing the Printed Document From the Front Push Tractor73Removing the Tractor From the Front Push Position74Using the Tractor in the Rear Push Position74Installing the Tractor in the Rear Push Position75Loading Paper With the Rear Push Tractor76Removing the Printed Document From the Rear Push Tractor79Removing the Tractor From the Rear Push Position80Using the Tractor in the Pull Position81Installing The Tractor in the Pull Position81Loading Paper With the Pull Tractor84Removing the Paper From the Pull Tractor89Removing the Tractor From the Pull Tractor Position89Switching Between Printing on Continuous Paper and Single Sheets94Removing the Tractor From the Pull Tractor Position94Switching to Printing on Continuous Paper95Adjusting the Top- of- Form Position96Advancing the Paper to the Tear- Off Edge98Using the Tear Off/Bin button98Advancing Paper to the Tear-off Position Automatically99Adjusting the Tear-Off Position99CHAP 4-PRINTING ON SINGLE SHEETS102Available Paper Types103Using the Paper Guide103Installing the Paper Guide104Loading Paper in the Paper Guide105Loading Envelopes107CHAP 5-CHANGING PRINTER SETTINGS FROM THE PRINTER'S CONTROL PANEL108Selecting a Built- In Font109Making Default Settings110Understanding Default Settings110Changing Default Settings116CHAP 6-USING EPSON STATUS MONITOR 2118About the EPSON Status Monitor 2 Utility119Installing EPSON Status Monitor 2119Accessing EPSON Status Monitor 2120Status Monitor Overview121Using the Background Monitoring Feature127CHAP 7-TROUBLESHOOTING130Using the Error Indicators131Problems and Solutions132Power Supply Problems132Paper Loading or Feeding Problems133Wrong Top-Of-Form Position136Wrong Tear-Off Position137Printing or Printout Quality Problems138Clearing Paper Jams142Aligning Vertical Lines in Your Printout143Printing a Self Test144Printing a Hex Dump146APPENDIX A-ENHANCING YOUR PRINTER WITH OPTIONS148Paper Handling Options149Using the Optional Cut- Sheet Feeders151Installing an Optional Cut-Sheet Feeder151Loading Paper in the Single-Bin Cut-Sheet Feeder153Loading Paper in the High-Capacity Cut-Sheet Feeder157Assembling the Double-Bin Cut-Sheet Feeder160Selecting Your Paper Path (bin 1 or bin 2)161Using an Optional Front Sheet or Front Paper Guide162Installing the Front Sheet or Front Paper Guide163Loading Paper in the Front Sheet or Front Paper Guide165Using the Roll Paper Holder167Assembling the Roll Paper Holder167Installing the Roll Paper Holder168Loading Roll Paper169Installing an Interface Card172Using a Serial Interface Card (C82305] or 82306] )174Selecting a Baud Rate174Handshake Timing174Error Handling174APPENDIX B-CLEANING AND TRANSPORTING THE PRINTER175Cleaning the Printer176Transporting the Printer177APPENDIX C-SPECIFICATIONS178Printer Specifications179Command Lists189Character Tables194APPENDIX D-CUSTOMER SUPPORT INFORMATION204Contacting Customer Support205For United States and Canada Users205For United Kingdom and the Republic of Ireland Users207For Australian Users209For Singapore Users210For Hong Kong Users210For Philippines Users211GLOSSARY212INDEX216Size: 3.4 MBPages: 221Language: EnglishOpen manual
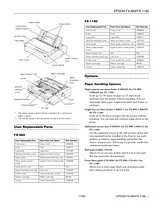
Introduction ManualTable of ContentsImportant Information About Your EPSON FX-880T1Features1Installing the Printer Driver2Windows (95, 98, 2000, Me, NT 4.0)3For USB Connections (Windows 98, 2000, and Me)4Windows 3.1 or NT 3.51x5Changing Default Settings6Selecting the Number of Lines Per Inch8Size: 126 KBPages: 8Language: EnglishOpen manual
Introduction ManualTable of ContentsImportant Information About Your EPSON FX-880T1Features1Installing the Printer Driver2Windows (95, 98, 2000, Me, NT 4.0)3For USB Connections (Windows 98, 2000, and Me)4Windows 3.1 or NT 3.51x5Changing Default Settings6Selecting the Number of Lines Per Inch8Size: 126 KBPages: 8Language: EnglishOpen manual
User ManualTable of ContentsUSER REPLACEABLE PARTS1FX-8801FX-11801OPTIONS1Paper Handling Options1Optional Interface Cards2PRINTER SPECIFICATIONS2Mechanical2Electrical3Environmental3Paper3Printable Area4Safety Approvals5CONTROL PANEL BUTTONS AND LIGHTS5ERROR INDICATORS6STATUS MONITOR7PAPER POSITIONS7Top-of-Form Position7Tear-off Position7Standby Position7AVAILABLE PAPER PATHS7Printing on Continuous Paper7Printing on Single Sheets8PAPER RELEASE LEVER POSITIONS8PAPER THICKNESS LEVER POSITIONS9PAPER HANDLING9Loading Continuous Paper Onto a Push Tractor9Removing the Printed Document from a Push Tractor9Switching to Printing on Single Sheets10Switching to Printing on Continuous Paper10Adjusting the Top-of-Form Position11Advancing the Paper to the Tear-off Edge11REPLACING THE RIBBON CARTRIDGE12CLEARING THE PAPER JAMS13USING THE DEFAULT-SETTING MODE13Changing Default Settings14ALIGNING VERTICAL LINES IN YOUR PRINTOUT14PRINTING A SELF TEST15PRINTING A HEX DUMP15CLEAING THE PRINTER16TRANSPORTING THE PRINTER16RELATED DOCUMENTATION16Size: 790 KBPages: 16Language: EnglishOpen manual
User ManualTable of ContentsFRONT MATTER1Printer Parts3Control Panel Buttons and Lights4CONTENTS5GETTING TO KNOW YOUR PRINTER11Features12Available Paper Paths13Options17Ribbon Cartridges17Important Safety Instructions18Print Head Caution Symbol19Compliance20For United Kingdom Users20How To Use Your Manuals21Warnings, Cautions, and Notes22CHAP 1-SETTING UP THE PRINTER23Unpacking the Printer24Choosing a Place for the Printer25Positioning the continuous paper supply26Installing or Replacing the Ribbon Cartridge27Plugging in the Printer32Connecting the Printer to Your Computer33Installing the Printer Driver on Your PC35For Windows 95 or NT 4.035For Windows 3.1 or NT 3.5x38Optional Printer Drivers for DOS Program Users40CHAP 2-USING THE PRINTER SOFTWARE41About Your Printer Software42Using the Printer Driver With Windows 9543Using the Printer Driver With Windows 3.148Using the Printer Driver With Windows NT 4. 051Using the Printer Driver With Windows NT 3. 5x56Using the EPSON Remote! Utility61CHAP 3-PRINTING ON CONTINUOUS PAPER62Setting the Paper Release Lever63Setting the Paper Thickness Lever64Loading Multi- Part Forms65Loading Continuous Paper With Labels65Removing Continuous Paper with Labels66Using the Tractor in the Front Push Position67Installing the Tractor in the Front Push Position67Loading Paper With the Front Push Tractor69Removing the Printed Document From the Front Push Tractor73Removing the Tractor From the Front Push Position74Using the Tractor in the Rear Push Position74Installing the Tractor in the Rear Push Position75Loading Paper With the Rear Push Tractor76Removing the Printed Document From the Rear Push Tractor79Removing the Tractor From the Rear Push Position80Using the Tractor in the Pull Position81Installing The Tractor in the Pull Position81Loading Paper With the Pull Tractor84Removing the Paper From the Pull Tractor89Removing the Tractor From the Pull Tractor Position89Switching Between Printing on Continuous Paper and Single Sheets94Removing the Tractor From the Pull Tractor Position94Switching to Printing on Continuous Paper95Adjusting the Top- of- Form Position96Advancing the Paper to the Tear- Off Edge98Using the Tear Off/Bin button98Advancing Paper to the Tear-off Position Automatically99Adjusting the Tear-Off Position99CHAP 4-PRINTING ON SINGLE SHEETS102Available Paper Types103Using the Paper Guide103Installing the Paper Guide104Loading Paper in the Paper Guide105Loading Envelopes107CHAP 5-CHANGING PRINTER SETTINGS FROM THE PRINTER'S CONTROL PANEL108Selecting a Built- In Font109Making Default Settings110Understanding Default Settings110Changing Default Settings116CHAP 6-USING EPSON STATUS MONITOR 2118About the EPSON Status Monitor 2 Utility119Installing EPSON Status Monitor 2119Accessing EPSON Status Monitor 2120Status Monitor Overview121Using the Background Monitoring Feature127CHAP 7-TROUBLESHOOTING130Using the Error Indicators131Problems and Solutions132Power Supply Problems132Paper Loading or Feeding Problems133Wrong Top-Of-Form Position136Wrong Tear-Off Position137Printing or Printout Quality Problems138Clearing Paper Jams142Aligning Vertical Lines in Your Printout143Printing a Self Test144Printing a Hex Dump146APPENDIX A-ENHANCING YOUR PRINTER WITH OPTIONS148Paper Handling Options149Using the Optional Cut- Sheet Feeders151Installing an Optional Cut-Sheet Feeder151Loading Paper in the Single-Bin Cut-Sheet Feeder153Loading Paper in the High-Capacity Cut-Sheet Feeder157Assembling the Double-Bin Cut-Sheet Feeder160Selecting Your Paper Path (bin 1 or bin 2)161Using an Optional Front Sheet or Front Paper Guide162Installing the Front Sheet or Front Paper Guide163Loading Paper in the Front Sheet or Front Paper Guide165Using the Roll Paper Holder167Assembling the Roll Paper Holder167Installing the Roll Paper Holder168Loading Roll Paper169Installing an Interface Card172Using a Serial Interface Card (C82305] or 82306] )174Selecting a Baud Rate174Handshake Timing174Error Handling174APPENDIX B-CLEANING AND TRANSPORTING THE PRINTER175Cleaning the Printer176Transporting the Printer177APPENDIX C-SPECIFICATIONS178Printer Specifications179Command Lists189Character Tables194APPENDIX D-CUSTOMER SUPPORT INFORMATION204Contacting Customer Support205For United States and Canada Users205For United Kingdom and the Republic of Ireland Users207For Australian Users209For Singapore Users210For Hong Kong Users210For Philippines Users211GLOSSARY212INDEX216Size: 3.4 MBPages: 221Language: EnglishOpen manual