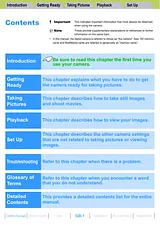
ユーザーガイド目次Contents1Introduction2What Your Camera Can Do2System Map3Nomenclature4Names of the menus and icons shown on the screen6Display in Camera AUTO, Continuous shooting AUTO, EXT., SCENE or Movie mode6Display in Playback mode8Image Information Display (INFORMATION/Quick View)8LED display9Self-timer LED (red)9Card access LED (orange)9FCC Compliance Statement for American Users10Handling Precautions11Caution and Warning Symbols11Getting Ready19Inserting the Batteries19Removing the Batteries20Inserting the Memory Card21Write-protect Switch (*SD memory cards only)22Removing the Memory Card23Turning the Camera On24Guide to viewing the low battery warnings and replacing the batteries24Setting the Date and Time25Date display format25Using the Accessories27Attaching the Shoulder Strap27Using the Lens Cap27Taking Pictures28Taking Still Images32Holding the camera32Pressing the shutter release button half way33When the Memory Card is Full34Using Continuous Shooting Mode35Shooting Movies37[SOUND] Shooting Movies Without Sound39Setting the Frame Rate for Movies (frames per second)40Selecting Scenes to Automatically Set the Focus and Flash42Selecting the Scene Mode42Switching Between Macro and Landscape Mode44Using Macro Mode45Using Self-Timer46Using Zoom (Wide-angle and Telephoto)48Switching the Digital Zoom ON and OFF49Using Flash51Flash Modes51Setting the Flash Mode52Flash variations in Macro/Landscape mode, AE mode and Drive mode55Effective flash range55Avoiding camera shake56Adjusting Brightness57Using Exposure Compensation57[AE MODE] Selecting the Exposure Setting Method58[METERING] Selecting the Area Used for Setting the Exposure60[LONG EXP.] Using Slow Shutter Speeds to Shoot Dark Subjects62[ISO] Changing the ISO Sensitivity to Shoot Fast Moving Subjects64Setting Focus66Focusing Off-Center (Focus Lock)66Subjects That Are Difficult to Focus On67[FOCUSING] Selecting the focusing method67[AF MODE] Still and Moving Subjects69Displaying Information on the LCD Monitor70[REC REVIEW] Checking Images Right After You Shoot Them71Quickly Checking/Erasing Your Shots (Quick View)72Selecting the Number of Pixels (Image Size) and the Quality74Selecting the Number of Pixels74Selecting the Quality (Compression Ratio)75Available shots and capacities for different image size and quality (compression ratio) combinations76Guide to choosing the image size and image quality76Adjusting Image Colors and Other Settings77Selecting the Light Source (White Balance)77[WB PRESET] Setting Your Own Value for White78[COLOR MODE] Selecting Color, Black & White or Sepia79[CHROMA] Changing the color intensity80[SHARPNESS] Enhancing the Image Outlines82[CONTRAST] Enhancing the Contrast83Switching Display Screen (Electronic Viewfinder and LCD Monitor)85Setting the exposure and focus during continuous shooting (Drive mode)86Playback88Viewing Still Images89Viewing Your Images Enlarged90Viewing Movies91Viewing Images Automatically as a Slideshow (slideshow)92[AUTO PLAY] settings92Starting and Ending an [AUTO PLAY] Slideshow95Viewing Multiple Images97Displaying multiple images97Using the multi playback screen98To return to normal playback (single-image display)98Erasing Images in the Multi Playback Screen99[INFORMATION] Viewing Image Information101Erasing Unwanted Images102Erasing individual images (ERASE)102Erasing selected images (SELECT AND ERASE)103Erasing all the images (ERASE ALL)105Protecting Images from Accidental Erasing (PROTECT)106Protecting an image106Unprotecting images107Tips for Erasing Images Using [PROTECT] and [ERASE ALL]108Adding Voice Messages to Still Images (POSTRECORDING)109Recording a message109Playing back a recorded message111Erasing voice messages112Resizing and Trimming Images (RESIZE)113Resizing an image114Checking and erasing resized images116Resizing all the images117Erasing all resized images118Rotating an Image120Using DPOF to specify print settings121Specifying DPOF settings121Specifying index print settings123Deleting all the DPOF print settings124Printing by Connecting the Camera Directly to a Printer (PictBridge)126Connecting the camera to the printer126Specifying the print settings127Printing individual images130Printing multiple images131Printing using DPOF settings132Ending PictBridge133Connecting to a Windows PC134Computer hardware and software requirements134Installing the USB drivers (Windows 98 and Windows 98SE only)135If you no longer need the USB drivers136Viewing images on a Windows PC137Memory card folder configuration139Disconnecting the USB cable from a Windows PC140Deleting the Device (Windows 98 and Windows 98SE only)142Connecting to a Macintosh144Computer hardware and software requirements144Viewing images on a Macintosh145Memory card folder configuration147Disconnecting the USB cable from a Macintosh148Set Up149[BRIGHT CNTRL] Adjusting the LCD Monitor Brightness150[FORMAT] Initializing Memory Cards151[POWER SAVE] Having the Camera Turn Off Automatically to Save Power152Notes on using Power Save154[MODE LOCK] Preserving Your Function Settings155[BEEP] Adjusting the Volume of the Camera Button Beep156[SHUTTER VOL] Adjusting the Volume of the Shutter Sound157[SELECT LCD] Selecting the Display Used at Startup158[START SCREEN] Selecting the Startup Screen159To set the Finecam logo screen159To set a user-defined screen160Turning the startup screen off161[LANGUAGE] Selecting the Menu Language162[VIDEO OUT] Setting the Output Format for a TV Connection163[FILE NO.] Starting Image File Numbers from 0001164[MODE RESET] Resetting Function Settings166Mode-locked Menu Options and Default Settings167Troubleshooting172Problems and Solutions172Messages and Responses174Basic Glossary of Digital Camera Terms175Detailed Contents180INDEX184サイズ: 7.75MBページ数: 186Language: Englishマニュアルを開く
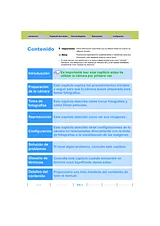
ユーザーガイド目次Contenido1Introducción2Qué puede hacer con su cámara2Mapa del sistema3Nombres de los componentes4Menús visualizados en la pantalla y nombres de los iconos6Se visualiza en el modo Cámara AUTO, disparo continuo AUTO, EXT., SCENE o película6Se visualiza en Modo de reproducción8Pantalla de información sobre la imagen (INFORMATION/Quick View)8Indicadores LED9LED del autodisparador (rojo)9LED de acceso a la tarjeta (naranja)9Precauciones10Símbolos de precaución y de advertencia10Preparación de la cámara19Inserción de las baterías19Extracción de las baterías20Inserción de la tarjeta de memoria21Interruptor de protección contra escritura (*Sólo tarjetas de memoria SD)22Extracción de la tarjeta de memoria23Encendido de la cámara24Guía para ver las advertencias de batería baja y de reemplazo de las baterías24Configuración de la fecha y la hora25Formato de visualización de fecha25Uso de los accesorios27Fijación de la correa del hombro27Uso de la tapa del objetivo27Toma de fotografías28Toma de imágenes fijas32Sujeción de la cámara32Pulsación del botón disparador hasta la mitad33Cuando se llena la tarjeta de memoria34Uso del modo de disparo continuo35Filmar películas37[SONIDO] Filmación de películas sin sonido39Configuración de la velocidad de fotogramas para las películas (Fotogramas por segundo)40Seleccionar escenas para ajustar automáticamente el enfoque y el flash42Selección del modo escena42Modos macro y paisaje44Uso del modo macro45Uso del autodisparador46Uso del zoom (Gran angular y telefoto)48Activación y desactivación del zoom digital49Uso del flash51Modos de flash51Configuración del modo de flash52Variaciones de flash en el modo macro/paisaje, modo AE y modo de accionamiento55Alcance efectivo del flash56Evitar la vibración de la cámara56Ajuste del brillo57Uso de la compensación de exposición57[MOD EXP AUTO] Selección del método de ajuste de la exposición58[MEDICIÓN] Selección de la zona utilizada para ajustar la exposición61[EXPOS LARGA] Utilización de velocidades de obturación lentas para fotografiar motivos en la oscuridad63[ISO] Cambio de la sensibilidad ISO para fotografiar motivos que se mueven rápidamente65Ajuste del enfoque67Enfoque fuera del centro (Bloqueo del enfoque)67Motivos difíciles de enfocar68[ENFOQUE] Selección del método de enfoque68[MODO AF] Motivos estáticos y en movimiento70Visualizar información en el monitor de LCD71[REVIS GRABAC] Comprobación de las imágenes inmediatamente después de captarlas72Verificación/borrado rápido de sus fotografías (Quick view)74Selección del número de píxeles (tamaño de la imagen) y de la calidad76Selección del número de píxeles76Selección de la calidad (Relación de compresión)77Tomas disponibles y capacidades para las diferentes combinaciones de tamaño/calidad (relación de compresión) de imagen78Directrices para seleccionar tamaño y calidad de imagen78Ajuste de los colores de la imagen y otras configuraciones79Selección de la fuente de luz (Equilibrio del blanco)79[BCE BCO PRSC] Configuración de su propio valor para el blanco80[MODO COLOR] Selección de Color, B/N o Sepia82[CROMINANCIA] Cambio en la intensidad de los colores83[NITIDEZ] Realce de los bordes de las imágenes84[CONTRASTE] Realce del contraste85Cambiar la pantalla de visualización (Visor electrónico y monitor de LCD)87Ajuste de la exposición y el enfoque durante el disparo continuo (modo de disparo)88Reproducción90Visualización de imágenes fijas91Ver sus imágenes ampliadas92Visualizar sus películas93Visualización automática de imágenes como un Slideshow (pase de diapositivas)95Configuraciones de [REPRO AUT]95Cómo empezar y finalizar un Slideshow [REPRO AUT]98Visualizar múltiples imágenes100Visualizar múltiples imágenes100Uso de la pantalla de reproducción multi101Para volver a la reproducción normal (visualización de una sola imagen)101Borrar imágenes en la pantalla de reproducción multi102[INFORMACIÓN] Visualizar información sobre la imagen104Borrar imágenes que no necesita105Borrar imágenes individuales (BORRAR)105Borrar las imágenes seleccionadas (SELEC. Y BORRAR)106Borrar todas las imágenes (BORR TODO)108Proteger las imágenes contra el borrado accidental (PROTEGER)110Cómo proteger una imagen110Cómo cancelar la protección de las imágenes111Consejos para borrar imágenes utilizando [PROTEGER] y [BORR TODO]112Adición de mensajes de voz a las imágenes fijas113Grabar un mensaje113Cómo reproducir un mensaje grabado115Cómo borrar mensajes de voz116Redimensionado y recorte de imágenes (AJ TÑO)117Cómo redimensionar una imagen118Cómo verificar y borrar las imágenes redimensionadas120Cómo redimensionar todas las imágenes121Cómo borrar todas las imágenes redimensionadas122Rotación de imágenes124Uso de DPOF para especificar los ajustes de impresión126Cómo especificar los ajustes DPOF126Cómo especificar los ajustes de índice de impresión128Cómo borrar todos los ajustes de impresión DPOF129Cómo imprimir con la cámara conectada directamente a una impresora (PictBridge)131Cómo conectar la cámara a la impresora131Cómo especificar los ajustes de impresión132Cómo imprimir imágenes individuales135Imprimir múltiples imágenes136Impresión utilizando los ajustes DPOF137Salir de PictBridge139Conexión a un PC Windows140Requerimientos de hardware y software para el ordenador140Instalación de los controladores USB (Sólo Windows 98 y Windows 98SE)141Si ya no necesita los controladores USB142Viendo imágenes en un PC143Configuración de la carpeta para tarjeta de memoria145Desconexión del cable USB de un PC Windows146Borrar el dispositivo (Sólo Windows 98 y Windows 98SE)148Conexión a un Macintosh150Requerimientos de hardware y software para el ordenador150Ver imágenes en un Macintosh151Configuración de la carpeta de la tarjeta de memoria153Desconexión del cable USB de un Macintosh154Configuración155[CNTRL BRILLO] Ajuste del brillo del monitor LCD156[FORMATO] Formatear las tarjetas de memoria157[AHORRA ENERG] Autoapagado de la cámara para ahorrar energía158Notas sobre el uso de ahorro de energía160[MODO TRABA] Conservación de los ajustes realizados161[PITIDO] Ajuste de volumen para el pitido de los botones de la cámara162[VOL OBTURAD.] Ajuste de volumen para el sonido del obturador163[SELEC. LCD] Selección de la pantalla utilizada al encender la cámara164[PANT INICIAL] Selección de la pantalla inicial165Para seleccionar la pantalla con el logotipo de la Finecam165Para ajustar la pantalla definida por el usuario166Cómo desactivar la pantalla inicial168[LANGUAGE] Selección del idioma de los menús169[SALIDA VIDEO] Ajuste del formato de salida para conexión al televisor170[NÚM ARCHIVO] Iniciar los números de archivos de imágenes desde 0001171[MODO REAJUS] Reinicialización de los ajustes para las funciones173Opciones de menú del modo traba y ajustes predeterminados174Solución de problemas179Problemas y soluciones179Mensajes y soluciones181Glosario básico de términos de la cámara digital182Detalles del contenido187サイズ: 6.78MBページ数: 191Language: Españolマニュアルを開く