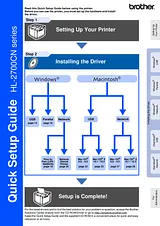
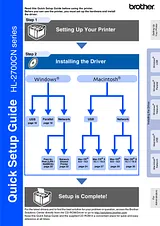
Anleitung Für Quick SetupInhaltsverzeichnisRegulations4Getting Started6Carton Components6Control Panel7Supplied CD-ROM8Setting Up Your Printer9Install the Toner Cartridges9Remove the tension release pins of the Fusing Unit10Install the OPC Belt Cartridge11Load Paper in the Paper Tray12Print a Test Page13Setting Your Language on the Control Panel14Installing the Driver15For USB Interface Cable Users16For Parallel Interface Cable Users18For Network Interface Cable Users20For Brother Peer-to-Peer Network Printer Users (LPR / NetBIOS)20For Network Shared Printer Users22For USB Interface Cable Users24For Mac OS® 8.6 to 9.2 Users24For Mac OS® X 10.1 / 10.2 Users27For Network Interface Cable Users29For Mac OS® 8.6 to 9.2 Users29For Mac OS® X 10.1 / 10.2 Users30For Administrators32Installing BRAdmin Professional utility (Windows® users only)32Web BRAdmin (Windows® Users Only)32Setting your IP Address, Subnet Mask and Gateway using BRAdmin Professional utility (Windows® use...33Print Printer Settings Page33Factory Default Setting33Other Information34Shipment of the Printer34Options35Größe: 2,61 MBSeiten: 36Language: EnglishHandbuch öffnen
BenutzerhandbuchInhaltsverzeichnisRegulations4Getting Started6Carton Components6Control Panel7Supplied CD-ROM8Setting Up Your Printer9Install the Toner Cartridges9Remove the tension release pins of the Fusing Unit10Install the OPC Belt Cartridge11Load Paper in the Paper Tray12Print a Test Page13Setting Your Language on the Control Panel14Installing the Driver15Windows®15For USB Interface Cable Users16For Parallel Interface Cable Users18For Network Interface Cable Users20Macintosh®15For USB Interface Cable Users24For Mac OS® 8.6 to 9.2 Users24For Mac OS® X 10.1 / 10.2 Users27For Network Interface Cable Users29For Mac OS® 8.6 to 9.2 Users29For Mac OS® X 10.1 / 10.2 Users30For Administrators32Installing BRAdmin Professional utility (Windows® users only)32Web BRAdmin (Windows® Users Only)32Setting your IP Address, Subnet Mask and Gateway using BRAdmin Professional utility (Windows® users only)33Print Printer Settings Page33Factory Default Setting33Other Information34Shipment of the Printer34Options35Größe: 2,45 MBSeiten: 36Language: EnglishHandbuch öffnen
BenutzeranleitungInhaltsverzeichnisDefinitions of warnings, cautions, and notes2To use the printer safely3Printer do’s and don’ts for optimum print quality5Important information: Regulations8Federal Communications Commission (FCC) Declaration of Conformity (For USA)8Industry Canada Compliance Statement (For Canada)9Radio interference (220 to 240 volt model only)9International ENERGY STAR® Compliance Statement10Laser Safety (100 to 120 volt model only)10FDA Regulations (100 to 120 volt model only)10IEC 60825 specification (220 to 240 volt model only)11IMPORTANT - For Your Safety12Geräuschemission / Acoustic noise emission (for Germany only)12Wiring information (for UK)12Trademarks13Compilation and Publication Notice13Shipment of the Printer13Table of Contents15About this printer19What is in the box?19Front view21Back view22Features232400 DPI class resolution23High speed and color laser printing23Color Advanced Photoscale Technology (CAPT)23High Resolution Control (HRC)23Maintenance-free and economical toner cartridge23Universal paper tray23Three interfaces23Automatic Interface Selection24Five emulation modes24Automatic Emulation Selection24Data compression technology24Fonts24Panel lock setting25Power Save Mode25Toner Save Mode25Reprint setting25Network25Positioning the printer26Power Supply26Environment26What kind of paper can I use?28Type and size of paper28Suitable paper specifications28Recommended paper30Printable area31Portrait31Landscape31Guidelines for selecting paper32Envelopes33Labels and transparencies35Paper feed36Tray feed36Manual feed37Paper output37Driver and software38Printer driver38For Windows®39Features in the PCL printer driver39Basic Tab39Advanced tab40Accessories tab45Support Tab46Features in the PS printer driver47Ports tab47Device Settings tab48Layout tab49Paper / Quality tab50Advanced options51For Macintosh®53Software55Software for Networks55BRAdmin Professional utility55Driver Deployment Wizard55Web BRAdmin55Automatic Emulation Selection56Automatic Interface Selection57Printer settings57Factory settings57Control panel58Control panel58Buttons59Go button60Job Cancel button60+ or - button60To move through menus in the LCD60To enter numbers60Set button60Back button61Light-emitting diodes (LEDs)62Liquid crystal display (LCD)63LCD messages63Printer status messages64How to use the control panel64Control panel LCD menu66Set date and time76Set IP address77About emulation modes78List of factory settings79Network factory default setting79Reprint setting83Reprinting from RAM83Reprinting the last job84Printing PROOF data85Printing PUBLIC data85Printing SECURE data86When there is no reprint data in memory88To delete the job88To cancel the reprint job88Options89Optional accessories and supplies89Lower tray unit (LT-27CL)89Legal tray (LT-27LG)89Duplex unit (DX-2700)89CompactFlash® card89SO-DIMM memory89Optional fonts package89Lower tray unit (LT-27CL)90Putting paper in the lower tray unit90How to install the lower tray unit90Legal tray (LT-27LG)93How to install the legal tray93Duplex unit (DX-2700)95How to install the duplex unit95Guidelines for printing on both sides of the paper98Paper orientation for printing on both sides of the paper98CompactFlash® card99Inserting the CompactFlash® card100SO-DIMM101Installing additional memory102Optional fonts package104Optional fonts package (BS-3000)104Optional barcode fonts package (BT-1000)104Selecting the optional fonts104Routine maintenance106Replacing the consumable items106Toner cartridges109Toner nearly empty message109TONER EMPTY message109Replacing the toner cartridges110Waste toner pack113Waste toner pack full message113Replacing the waste toner pack114OPC belt cartridge115Replace OPC belt cartridge message115Replacing the OPC belt cartridge115Fusing unit118Replace fusing unit message118Replacing the fusing unit119120K kit121Replacing the transfer belt cleaner121Replacing the transfer roller123Cleaning126Cleaning the outside of the printer127Cleaning the inside of the printer128Shipping the printer133Troubleshooting134LCD messages134Error messages134Maintenance messages136Call service messages137Paper jams and how to clear them140JAM A1 / JAM A2 (paper jam in the paper tray)141JAM B (paper jam at the entrance to the fusing roller)142JAM C (paper jam where the paper comes out of the printer)144JAM D (paper jam in the lower part of the duplex unit)146JAM E (paper jam in the upper part of the duplex unit)147Improving the print quality149Q & A153Setting up the printer hardware153Setting up the printer154Paper handling155Printing156Appendix157Printer specifications157Printing157Features158Electrical and mechanical159Paper specifications160Paper handling160Media specifications160INDEX161Größe: 2,91 MBSeiten: 162Language: EnglishHandbuch öffnen
BenutzerhandbuchInhaltsverzeichnisDefinitions of warnings, cautions, and notes2To use the printer safely3Printer do’s and don’ts for optimum print quality5Important information: Regulations8Federal Communications Commission (FCC) Declaration of Conformity (For USA)8Industry Canada Compliance Statement (For Canada)9Radio interference (220 to 240 volt model only)9International ENERGY STAR® Compliance Statement10Laser Safety (100 to 120 volt model only)10FDA Regulations (100 to 120 volt model only)10IEC 60825 specification (220 to 240 volt model only)11IMPORTANT - For Your Safety12Geräuschemission / Acoustic noise emission (for Germany only)12Wiring information (for UK)12Trademarks13Compilation and Publication Notice13Shipment of the Printer13Table of Contents15About this printer19What is in the box?19Front view21Back view22Features232400 DPI class resolution23High speed and color laser printing23Color Advanced Photoscale Technology (CAPT)23High Resolution Control (HRC)23Maintenance-free and economical toner cartridge23Universal paper tray23Three interfaces23Automatic Interface Selection24Five emulation modes24Automatic Emulation Selection24Data compression technology24Fonts24Panel lock setting25Power Save Mode25Toner Save Mode25Reprint setting25Network25Positioning the printer26Power Supply26Environment26What kind of paper can I use?28Type and size of paper28Suitable paper specifications28Recommended paper30Printable area31Portrait31Landscape31Guidelines for selecting paper32Envelopes33Labels and transparencies35Paper feed36Tray feed36Manual feed37Paper output37Driver and software38Printer driver38For Windows®39Features in the PCL printer driver39Basic Tab39Advanced tab40Accessories tab45Support Tab46Features in the PS printer driver47Ports tab47Device Settings tab48Layout tab49Paper / Quality tab50Advanced options51For Macintosh®53Software55Software for Networks55BRAdmin Professional utility55Driver Deployment Wizard55Web BRAdmin55Automatic Emulation Selection56Automatic Interface Selection57Printer settings57Factory settings57Control panel58Control panel58Buttons59Go button60Job Cancel button60+ or - button60To move through menus in the LCD60To enter numbers60Set button60Back button61Light-emitting diodes (LEDs)62Liquid crystal display (LCD)63LCD messages63Printer status messages64How to use the control panel64Control panel LCD menu66Set date and time76Set IP address77About emulation modes78List of factory settings79Network factory default setting79Reprint setting83Reprinting from RAM83Reprinting the last job84Printing PROOF data85Printing PUBLIC data85Printing SECURE data86When there is no reprint data in memory88To delete the job88To cancel the reprint job88Options89Optional accessories and supplies89Lower tray unit (LT-27CL)89Legal tray (LT-27LG)89Duplex unit (DX-2700)89CompactFlashTM card89SO-DIMM memory89Optional fonts package89Lower tray unit (LT-27CL)90Putting paper in the lower tray unit90How to install the lower tray unit90Legal tray (LT-27LG)93How to install the legal tray93Duplex unit (DX-2700)95How to install the duplex unit95Guidelines for printing on both sides of the paper98Paper orientation for printing on both sides of the paper98CompactFlashTM card99Inserting the CompactFlashTM card100SO-DIMM101Installing additional memory102Optional fonts package104Optional fonts package (BS-3000)104Optional barcode fonts package (BT-1000)104Selecting the optional fonts104Routine maintenance106Replacing the consumable items106Toner cartridges109Toner nearly empty message109TONER EMPTY message109Replacing the toner cartridges110Waste toner pack113Waste toner pack full message113Replacing the waste toner pack114OPC belt cartridge115Replace OPC belt cartridge message115Replacing the OPC belt cartridge115Fusing unit118Replace fusing unit message118Replacing the fusing unit119120K kit121120K kit121Replacing the 120K kit122Cleaning126Cleaning the outside of the printer127Cleaning the inside of the printer128Shipping the printer134Troubleshooting135LCD messages135Error messages135Maintenance messages137Call service messages138Paper jams and how to clear them141JAM A1 / JAM A2 (paper jam in the paper tray)142JAM B (paper jam at the entrance to the fusing roller)143JAM C (paper jam where the paper comes out of the printer)145JAM D (paper jam in the lower part of the duplex unit)147JAM E (paper jam in the upper part of the duplex unit)148Improving the print quality150Q & A154Setting up the printer hardware154Setting up the printer155Paper handling156Printing157Appendix158Printer specifications158Printing158Features159Electrical and mechanical160Paper specifications161Paper handling161Media specifications161INDEX162Größe: 3 MBSeiten: 163Language: EnglishHandbuch öffnen
NetzwerkanleitungenInhaltsverzeichnisTable of Contents4Unix Printing10Printing from Unix/Linux Using TCP/IP10Overview10TCP/IP11General TCP/IP UNIX Host Configuration11Linux Configuration15Linux Configuration Using CUPS15HP-UX Configuration16IBM RS/6000 AIX Configuration17Sun Solaris 2.x Configuration18SCO UNIX Configuration19IBM AS/40020Other Systems22Other Sources of Information23TCP/IP Printing24Printing from Windows NT®4.0, Windows® 2000/XP, LAN Server and Warp Server24Overview24Windows NT®4.0 and Windows® 2000/XP (TCP/IP) Configuration25Windows® 2000/XP Printing (Printer Driver not yet installed)25Standard TCP/IP Port Printing25Windows® 2000/XP Printing (Printer Driver already installed)27Windows NT®4.0 Printing27Windows NT®4.0 Printing: Installing the Brother Peer to Peer Software28Windows NT®4.0 Printing: Associating to the Printer29Windows NT®4.0 Printing: Adding a Second Brother LPR Port30LAN Server, OS/2 Warp Server Configuration30Server Configuration30Configuration of an OS/2 Server31Other Sources of Information33Peer to Peer Printing34How to Print in a Windows® 95/98/Me Peer to Peer Network34Overview34Quick Tips:34Driver Deployment Wizard35TCP/IP Printing35Installing the Brother Peer to Peer Software36Associating to the Printer37Adding a Second Brother LPR Port38Other Sources of Information38NetBIOS Peer to Peer Printing39How to Print Using NetBIOS in Windows® 95/98/Me/2000/XP, Windows NT®4.0, LAN Server and OS/2 Warp Server39Overview39Print Server Configuration40Changing the Workgroup/Domain Name Using TELNET or BRCONFIG or a Web Browser41NetBIOS Port Monitor for Windows® 95/98/Me/ 2000/XP and Windows NT®4.042Installing the Brother NetBIOS Port Monitor42Associating the Printer43Windows® 95/98/Me43Windows NT®4.0 /Windows® 2000/XP44Adding a Second NetBIOS Print Port45Windows® 95/98/Me45Windows NT®4.0 / Windows® 2000/XP46LAN Server/OS/2 Warp Server Configuration46Server Configuration:46Workstation Configuration:47Other Sources of Information47Configuring Internet Printing for Windows®48Internet Printing Installation48Overview48Brother Internet Print General Information49Brother Internet Print: Configuring the Brother Print Server50Print Server Configuration Checklist50Brother Internet Print: Using BRAdmin to Configure the Print Server51Brother Internet Print: Using a Web Browser to Configure the Print Server52Brother Internet Print: Using TELNET to Configure the Print Server53Brother Internet Print: Installing the BIP Software on Windows® 95/98/Me/2000/XP and Windows NT®4.054Setup from CD-ROM54Adding a Second Brother Internet Port57Windows® 2000/XP IPP Printing57Specifying a Different URL59Other Sources of Information59Novell NetWare Printing60How to Configure Novell NetWare Printing60Overview60General Information61Creating a NDPS Printer Using NWADMIN for NetWare562NDPS Manager62NDPS Broker63Creating a Printer Agent64Configuring NetWare 3 and NetWare 4 Systems65Configuring the Brother Print Server (Queue Server Mode in Bindery Emulation Mode) Using BRAdmin65Configuring the Brother Print Server (Queue Server Mode in NDS mode) Using BRAdmin67Configuring the Brother Print Server (Queue Server Mode in NDS Mode) Using Novell NWADMIN and BRAdmin68Configuring the Brother Print Server (Remote Printer Mode in NDS mode) Using Novell NWAdmin and BRAdmin71Configuring the Brother Print Server (Queue Server Mode in Bindery Emulation Mode) Using PCONSOLE and BRCONFIG73Configuring the Brother Print Server (Queue Server Mode in NDS Mode) Using PCONSOLE and BRCONFIG74Configuring the Brother Print Server (Remote Printer Mode) Using PCONSOLE and BRCONFIG77Other Sources of Information81Printing From a Macintosh®82Printing From a Macintosh® Using AppleTalk and TCP/IP or the Simple Network Configuration capabilities of Mac OS® X.82Overview82Macintosh® Configuration (Mac OS® 8.6 to 9.2)84How to Select the Print Server (AppleTalk/ EtherTalk)851 Open the Chooser from the Apple Menu on the Macintosh®, and then click on the LaserWriter8 icon (if necessary, select the appropriate AppleTalk zone from the Network Control Panel).852 Select BRN_xxxxxx_P1_AT, then click Create. xxxxxx is the last six digits of the Ethernet address.85How to Select the Print Server (TCP/IP)851 Double click the Macintosh HD icon - the Applications (Mac OS® 9) folder - the Utilities folder - the Desktop Printer Utility ...852 Select Printer LPR, and then click OK.863 Click Change in PostScript Printer Description (PPD) File.86Macintosh® Configuration (Mac OS® X 10.1/10.2)89How to Select the Print Server (AppleTalk/ EtherTalk)89How to Select the Print Server (TCP/IP)90Printing from a Macitosh® Using the Simple Network Configuration capabilities of Mac OS® X (Mac OS® X 10.2.4 - 10.3 or greater)91How to Select the Printer Driver91Changing the Configuration92Other Sources of Information92DLC Printing93Printing from Windows NT®4.0 or Windows® 200093Overview93Configuring DLC on Windows NT® 4.0 and Windows® 200093Windows® 2000 Printer Setup94Windows NT®4.0 Printer Setup95Configuring DLC on Other Systems96Other Sources of Information97Web Based Management98How to use a Web Browser to Manage Your Device98Overview98How to Connect to Your Printer Using a Browser99Other Sources of Information99TCP/IP Configuration100Assigning TCP/IP Information100Overview100Using the Printer Control Panel to Allocate an IP Address (Printers with LCD Panels Only)101Changing the IP Address Using the BRAdmin Application101Using BRAdmin and the IPX/SPX Protocol to Set the IP Address102Using BRAdmin and the TCP/IP Protocol to Set the IP Address103Using DHCP to Configure the IP Address104Using APIPA to Configure the IP Address104Using ARP to Configure the Print Server IP Address105Using RARP to Configure the IP Address107Using BOOTP to Configure the IP Address108Configuring the IP Address with BRCONFIG109Changing the IP Address Settings with the TELNET Console110Troubleshooting112Overview112Installation Problems112Intermittent Problems115TCP/IP Troubleshooting115UNIX Troubleshooting116Windows NT®4.0/LAN Server (TCP/IP) Troubleshooting118Windows® 95/98/Me Peer to Peer Print (LPR) Troubleshooting118Windows® 95/98/Me Peer-to-Peer (HP JetAdmin Compatible Method) Troubleshooting119Windows® 95/98/Me and Windows NT®4.0 Peer-to- Peer Print (NetBIOS) Troubleshooting119Brother Internet Print (TCP/IP) Troubleshooting120Windows® 95/98/Me/2000/XP IPP Troubleshooting120Novell NetWare Troubleshooting121AppleTalk Troubleshooting122DLC/LLC Troubleshooting123Web Browser Troubleshooting (TCP/IP)123Appendix124Appendix A124General Information124BRAdmin (Recommended)124Web BRAdmin124HTTP (Recommended)125WebJetAdmin125TELNET125BRCONFIG125Using Services126General126Reloading the Print Server Firmware127General127Reloading Firmware Using BRAdmin128Reloading Process129Reloading Using the FTP Protocol from a Command Prompt130Reloading Using the FTP Protocol from a Web Browser131INDEX132Größe: 1000 KBSeiten: 134Language: EnglishHandbuch öffnen
BenutzerhandbuchInhaltsverzeichnisDefinitions of warnings, cautions, and notes2To use the printer safely3Printer do’s and don’ts for optimum print quality5Important information: Regulations8Federal Communications Commission (FCC) Declaration of Conformity (For USA)8Industry Canada Compliance Statement (For Canada)9Radio interference (220 to 240 volt model only)9International ENERGY STAR® Compliance Statement10Laser Safety (100 to 120 volt model only)10FDA Regulations (100 to 120 volt model only)10IEC 60825 specification (220 to 240 volt model only)11IMPORTANT - For Your Safety12Geräuschemission / Acoustic noise emission (for Germany only)12Wiring information (for UK)12Trademarks13Compilation and Publication Notice13Shipment of the Printer13Table of Contents15About this printer19What is in the box?19Front view21Back view22Features232400 DPI class resolution23High speed and color laser printing23Color Advanced Photoscale Technology (CAPT)23High Resolution Control (HRC)23Maintenance-free and economical toner cartridge23Universal paper tray23Three interfaces23Automatic Interface Selection24Five emulation modes24Automatic Emulation Selection24Data compression technology24Fonts24Panel lock setting25Power Save Mode25Toner Save Mode25Reprint setting25Network25Positioning the printer26Power Supply26Environment26What kind of paper can I use?28Type and size of paper28Suitable paper specifications28Recommended paper30Printable area31Portrait31Landscape31Guidelines for selecting paper32Envelopes33Labels and transparencies35Paper feed36Tray feed36Manual feed37Paper output37Driver and software38Printer driver38For Windows®39Features in the PCL printer driver39Basic Tab39Advanced tab40Accessories tab45Support Tab46Features in the PS printer driver47Ports tab47Device Settings tab48Layout tab49Paper / Quality tab50Advanced options51For Macintosh®53Software55Software for Networks55BRAdmin Professional utility55Driver Deployment Wizard55Web BRAdmin55Automatic Emulation Selection56Automatic Interface Selection57Printer settings57Factory settings57Control panel58Control panel58Buttons59Go button60Job Cancel button60+ or - button60To move through menus in the LCD60To enter numbers60Set button60Back button61Light-emitting diodes (LEDs)62Liquid crystal display (LCD)63LCD messages63Printer status messages64How to use the control panel64Control panel LCD menu66Set date and time76Set IP address77About emulation modes78List of factory settings79Network factory default setting79Reprint setting83Reprinting from RAM83Reprinting the last job84Printing PROOF data85Printing PUBLIC data85Printing SECURE data86When there is no reprint data in memory88To delete the job88To cancel the reprint job88Options89Optional accessories and supplies89Lower tray unit (LT-27CL)89Legal tray (LT-27LG)89Duplex unit (DX-2700)89CompactFlashTM card89SO-DIMM memory89Optional fonts package89Lower tray unit (LT-27CL)90Putting paper in the lower tray unit90How to install the lower tray unit90Legal tray (LT-27LG)93How to install the legal tray93Duplex unit (DX-2700)95How to install the duplex unit95Guidelines for printing on both sides of the paper98Paper orientation for printing on both sides of the paper98CompactFlashTM card99Inserting the CompactFlashTM card100SO-DIMM101Installing additional memory102Optional fonts package104Optional fonts package (BS-3000)104Optional barcode fonts package (BT-1000)104Selecting the optional fonts104Routine maintenance106Replacing the consumable items106Toner cartridges109Toner nearly empty message109TONER EMPTY message109Replacing the toner cartridges110Waste toner pack113Waste toner pack full message113Replacing the waste toner pack114OPC belt cartridge115Replace OPC belt cartridge message115Replacing the OPC belt cartridge115Fusing unit118Replace fusing unit message118Replacing the fusing unit119120K kit121120K kit121Replacing the 120K kit122Cleaning126Cleaning the outside of the printer127Cleaning the inside of the printer128Shipping the printer134Troubleshooting135LCD messages135Error messages135Maintenance messages137Call service messages138Paper jams and how to clear them142JAM A1 / JAM A2 (paper jam in the paper tray)143JAM B (paper jam at the entrance to the fusing roller)144JAM C (paper jam where the paper comes out of the printer)146JAM D (paper jam in the lower part of the duplex unit)148JAM E (paper jam in the upper part of the duplex unit)149Improving the print quality151Q & A155Setting up the printer hardware155Setting up the printer156Paper handling157Printing158Appendix159Printer specifications159Printing159Features160Electrical and mechanical161Paper specifications162Paper handling162Media specifications162INDEX163Größe: 2,93 MBSeiten: 164Language: EnglishHandbuch öffnen
BetriebsanweisungInhaltsverzeichnisTable of Contents4Unix Printing10Printing from Unix/Linux Using TCP/IP10Overview10TCP/IP11General TCP/IP UNIX Host Configuration11Linux Configuration15Linux Configuration Using CUPS15HP-UX Configuration16IBM RS/6000 AIX Configuration17Sun Solaris 2.x Configuration18SCO UNIX Configuration19IBM AS/40020Other Systems22Other Sources of Information23TCP/IP Printing24Printing from Windows NT®4.0, Windows® 2000/XP, LAN Server and Warp Server24Overview24Windows NT®4.0 and Windows® 2000/XP (TCP/IP) Configuration25Windows® 2000/XP Printing (Printer Driver not yet installed)25Standard TCP/IP Port Printing25Windows® 2000/XP Printing (Printer Driver already installed)27Windows NT®4.0 Printing27Windows NT®4.0 Printing: Installing the Brother Peer to Peer Software28Windows NT®4.0 Printing: Associating to the Printer29Windows NT®4.0 Printing: Adding a Second Brother LPR Port30LAN Server, OS/2 Warp Server Configuration30Server Configuration30Configuration of an OS/2 Server31Other Sources of Information33Peer to Peer Printing34How to Print in a Windows® 95/98/Me Peer to Peer Network34Overview34Quick Tips:34Driver Deployment Wizard35TCP/IP Printing35Installing the Brother Peer to Peer Software36Associating to the Printer37Adding a Second Brother LPR Port38Other Sources of Information38NetBIOS Peer to Peer Printing39How to Print Using NetBIOS in Windows® 95/98/Me/2000/XP, Windows NT®4.0, LAN Server and OS/2 Warp Server39Overview39Print Server Configuration40Changing the Workgroup/Domain Name Using TELNET or BRCONFIG or a Web Browser41NetBIOS Port Monitor for Windows® 95/98/Me/ 2000/XP and Windows NT®4.042Installing the Brother NetBIOS Port Monitor42Associating the Printer43Windows® 95/98/Me43Windows NT®4.0 /Windows® 2000/XP44Adding a Second NetBIOS Print Port45Windows® 95/98/Me45Windows NT®4.0 / Windows® 2000/XP46LAN Server/OS/2 Warp Server Configuration46Server Configuration:46Workstation Configuration:47Other Sources of Information47Configuring Internet Printing for Windows®48Internet Printing Installation48Overview48Brother Internet Print General Information49Brother Internet Print: Configuring the Brother Print Server50Print Server Configuration Checklist50Brother Internet Print: Using BRAdmin to Configure the Print Server51Brother Internet Print: Using a Web Browser to Configure the Print Server52Brother Internet Print: Using TELNET to Configure the Print Server53Brother Internet Print: Installing the BIP Software on Windows® 95/98/Me/2000/XP and Windows NT®4.054Setup from CD-ROM54Adding a Second Brother Internet Port57Windows® 2000/XP IPP Printing57Specifying a Different URL59Other Sources of Information59Novell NetWare Printing60How to Configure Novell NetWare Printing60Overview60General Information61Creating a NDPS Printer Using NWADMIN for NetWare562NDPS Manager62NDPS Broker63Creating a Printer Agent64Configuring NetWare 3 and NetWare 4 Systems65Configuring the Brother Print Server (Queue Server Mode in Bindery Emulation Mode) Using BRAdmin65Configuring the Brother Print Server (Queue Server Mode in NDS mode) Using BRAdmin67Configuring the Brother Print Server (Queue Server Mode in NDS Mode) Using Novell NWADMIN and BRAdmin68Configuring the Brother Print Server (Remote Printer Mode in NDS mode) Using Novell NWAdmin and BRAdmin71Configuring the Brother Print Server (Queue Server Mode in Bindery Emulation Mode) Using PCONSOLE and BRCONFIG73Configuring the Brother Print Server (Queue Server Mode in NDS Mode) Using PCONSOLE and BRCONFIG74Configuring the Brother Print Server (Remote Printer Mode) Using PCONSOLE and BRCONFIG77Other Sources of Information81Printing From a Macintosh®82Printing From a Macintosh® Using AppleTalk and TCP/IP or the Simple Network Configuration capabilities of Mac OS® X.82Overview82Macintosh® Configuration (Mac OS® 8.6 to 9.2)84How to Select the Print Server (AppleTalk/ EtherTalk)851 Open the Chooser from the Apple Menu on the Macintosh®, and then click on the LaserWriter8 icon (if necessary, select the appropriate AppleTalk zone from the Network Control Panel).852 Select BRN_xxxxxx_P1_AT, then click Create. xxxxxx is the last six digits of the Ethernet address.85How to Select the Print Server (TCP/IP)851 Double click the Macintosh HD icon - the Applications (Mac OS® 9) folder - the Utilities folder - the Desktop Printer Utility ...852 Select Printer LPR, and then click OK.863 Click Change in PostScript Printer Description (PPD) File.86Macintosh® Configuration (Mac OS® X 10.1/10.2)89How to Select the Print Server (AppleTalk/ EtherTalk)89How to Select the Print Server (TCP/IP)90Printing from a Macitosh® Using the Simple Network Configuration capabilities of Mac OS® X (Mac OS® X 10.2.4 - 10.3 or greater)91How to Select the Printer Driver91Changing the Configuration92Other Sources of Information92DLC Printing93Printing from Windows NT®4.0 or Windows® 200093Overview93Configuring DLC on Windows NT® 4.0 and Windows® 200093Windows® 2000 Printer Setup94Windows NT®4.0 Printer Setup95Configuring DLC on Other Systems96Other Sources of Information97Web Based Management98How to use a Web Browser to Manage Your Device98Overview98How to Connect to Your Printer Using a Browser99Other Sources of Information99TCP/IP Configuration100Assigning TCP/IP Information100Overview100Using the Printer Control Panel to Allocate an IP Address (Printers with LCD Panels Only)101Changing the IP Address Using the BRAdmin Application101Using BRAdmin and the IPX/SPX Protocol to Set the IP Address102Using BRAdmin and the TCP/IP Protocol to Set the IP Address103Using DHCP to Configure the IP Address104Using APIPA to Configure the IP Address104Using ARP to Configure the Print Server IP Address105Using RARP to Configure the IP Address107Using BOOTP to Configure the IP Address108Configuring the IP Address with BRCONFIG109Changing the IP Address Settings with the TELNET Console110Troubleshooting112Overview112Installation Problems112Intermittent Problems115TCP/IP Troubleshooting115UNIX Troubleshooting116Windows NT®4.0/LAN Server (TCP/IP) Troubleshooting118Windows® 95/98/Me Peer to Peer Print (LPR) Troubleshooting118Windows® 95/98/Me Peer-to-Peer (HP JetAdmin Compatible Method) Troubleshooting119Windows® 95/98/Me and Windows NT®4.0 Peer-to- Peer Print (NetBIOS) Troubleshooting119Brother Internet Print (TCP/IP) Troubleshooting120Windows® 95/98/Me/2000/XP IPP Troubleshooting120Novell NetWare Troubleshooting121AppleTalk Troubleshooting122DLC/LLC Troubleshooting123Web Browser Troubleshooting (TCP/IP)123Appendix124Appendix A124General Information124BRAdmin (Recommended)124Web BRAdmin124HTTP (Recommended)125WebJetAdmin125TELNET125BRCONFIG125Using Services126General126Reloading the Print Server Firmware127General127Reloading Firmware Using BRAdmin128Reloading Process129Reloading Using the FTP Protocol from a Command Prompt130Reloading Using the FTP Protocol from a Web Browser131INDEX132Größe: 1000 KBSeiten: 134Language: EnglishHandbuch öffnen
Anleitung Für Quick SetupInhaltsverzeichnisBestämmelser4Komma igång6Komponenter i kartongen6Kontrollpanel7Medföljande CD-ROM8Ställa in skrivaren9Sätta i tonerkassetterna9Ta bort fixeringsenhetens avspänningssprintar10Installera OPC-bältet11Fylla på papper i pappersfacket12Skriva ut en testsida13Ställa in språk på kontrollpanelen14Installera drivrutinen15Windows®15För användare av USB-kabel16För användare av parallell gränssnittskabel18För användare av nätverkskabel20För användare av Brother Peer-to-Peer nätverksskrivare (LPR/NetBIOS)20För användare av delad nätverksskrivare22Macintosh®15För användare av USB-kabel24För användare av Mac OS® 8.6 till 9.224För användare av Mac OS® X 10.1/10.227För användare av nätverkskabel29För användare av Mac OS® 8.6 till 9.229För användare av Mac OS® X 10.1/10.230För administratörer32Installera verktyget BRAdmin Professional (endast för Windows®-användare)32Web BRAdmin (endast för Windows®-användare)32Ställa in IP-adress, subnätmask och gateway med hjälp av verktyget BRAdmin Professional (endast Windows®-användare)33Skriva ut sidan med skrivarinställningar33Fabriksinställning33Övrig information34Transportera skrivaren34Tillbehör35Größe: 2,53 MBSeiten: 36Language: SvenskaHandbuch öffnen
BetriebsanweisungInhaltsverzeichnisTable des matières4Impression sous Unix10Impression sous Unix/Linux avec TCP/IP10Généralités10TCP/IP11Configuration générale de l’hôte UNIX avec TCP/IP11Configuration sous Linux15Configuration sous Linux à l’aide de CUPS15Configuration sous HP-UX16Configuration sous IBM RS/6000 AIX17Configuration sous Sun Solaris 2.x18Configuration sous SCO UNIX19IBM AS/40020Autres systèmes22Autres sources d’information23Impression TCP/IP24Impression sous Windows NT® 4.0, Windows® 2000/XP, LAN Server et Warp Server24Généralités24Configuration de Windows NT® 4.0 et Windows® 2000/XP (TCP/IP)25Impression sous Windows® 2000/XP (pilote d’imprimante non installé)25Impression TCP/IP standard25Impression sous Windows® 2000/XP (pilote d’imprimante déjà installé)27Impression sous Windows NT® 4.027Impression sous Windows NT® 4.0 : Installation du logiciel Peer to Peer Brother28Impression sous Windows NT® 4.0 : Association à l'imprimante29Impression sous Windows NT® 4.0 : Ajout d’un deuxième port LPR Brother30Configuration avec LAN Server, OS/2 Warp Server30Configuration du serveur30Configuration d’un serveur OS/231Autres sources d’information33Impression Peer to Peer34Comment imprimer sur un réseau Peer to Peer Windows® 95/98/Me34Généralités34Conseils :34Assistant de déploiement de pilote35Impression TCP/IP35Installation du logiciel Peer to Peer Brother36Association à l'imprimante37Ajout d’un deuxième port LPR Brother38Autres sources d’information38Impression Peer to Peer NetBIOS39Comment imprimer avec NetBIOS sous Windows® 95/98/Me/2000/XP, Windows NT® 4.0, LAN Server et OS/2 Warp Server39Généralités39Configuration du serveur d’impression40Modification du nom de groupe de travail/ domaine à l’aide de TELNET, de BRCONFIG ou d’un navigateur Web41NetBIOS Port Monitor pour Windows® 95/98/Me/ 2000/XP et Windows NT® 4.042Installation du NetBIOS Port Monitor de Brother42Association à l’imprimante43Windows® 95/98/Me43Windows NT® 4.0 /Windows® 2000/XP44Ajout d'un second port d'impression NetBIOS45Windows® 95/98/Me45Windows NT® 4.0 / Windows® 2000/XP46Configuration avec LAN Server/OS/2 Warp Server46Configuration du serveur :46Configuration des stations de travail :47Autres sources d’information47Configuration de l’impression sur Internet sous Windows®48Installation de l’impression sur Internet48Généralités48Informations générales sur l’impression Brother sur Internet49Impression Internet Brother : Configuration du serveur d’impression Brother50Aide-mémoire de la configuration du serveur d’impression50Impression Internet Brother : Utilisation de BRAdmin pour configurer le serveur d’impression51Impression Internet Brother : Utilisation d’un navigateur Web pour configurer le serveur d’impression52Impression Internet Brother : Utilisation de TELNET pour configurer le serveur d’impression53Impression Internet Brother : Installation du logiciel BIP sur un PC Windows® 95/98/Me/2000/ XP ou Windows NT® 4.054Installation à partir du CD-ROM54Ajout d’un second port Internet Brother57Impression IPP sous Windows® 2000/XP57Spécification d’un URL différent59Autres sources d’information59Impression sous Novell NetWare60Comment configurer l’impression sous Novell NetWare60Généralités60Généralités61Création d’une imprimante NDPS à l’aide de NWADMIN pour NetWare562NDPS Manager62NDPS Broker63Création d’un agent d’impression64Configuration des systèmes Netware 3 et NetWare 465Configuration du serveur d’impression Brother (mode serveur de file d’attente en mode émulation Bindery) à l’aide de BRAdmin65Configuration du serveur d’impression Brother (mode serveur de file d’attente en mode NDS) à l’aide de BRAdmin67Configuration du serveur d’impression Brother (mode serveur de file d’attente en mode NDS) à l’aide de Novell NWADMIN et de BRAdmin68Configuration du serveur d’impression Brother (mode imprimante à distance en mode NDS) à l’aide de Novell NWAdmin et de BRAdmin71Configuration du serveur d’impression Brother (mode serveur de file d’attente en mode émulation Bindery) à l’aide de PCONSOLE et de BRCONFIG73Configuration d’un serveur d’impression Brother (mode serveur de file d’attente en mode NDS) à l’aide de PCONSOLE et de BRCONFIG74Configuration du serveur d’impression Brother (mode imprimante à distance) à l'aide de PCONSOLE et de BRCONFIG77Autres sources d’information81Impression à partir d’un Macintosh®82Impression à partir d’un Macintosh® à l’aide de AppleTalk® et TCP/IP ou de la fonction de configuration simple du réseau de Mac OS® X82Généralités82Configuration sur Macintosh® (Mac OS® 8.6 à 9.2)84Comment sélectionner le serveur d’impression (AppleTalk/EtherTalk)85Comment sélectionner le serveur d’impression (TCP/IP)85Configuration sur Macintosh® (Mac OS® X 10.1/10.2)89Comment sélectionner le serveur d’impression (AppleTalk/EtherTalk)89Comment sélectionner le serveur d’impression (TCP/IP)90Impression depuis un Macintosh® à l’aide des fonctions de configuration simple du réseau de Mac OS® X (Mac OS® X 10.2.4 - 10.3 ou versions ultérieures)91Comment sélectionner le serveur d’impression91Modification de la configuration92Autres sources d’information92Impression avec DLC93Impression sous Windows NT® 4.0 ou Windows® 200093Généralités93Configuration de DLC sous Windows NT® 4.0 et Windows® 200093Configuration de l'imprimante sous Windows® 200094Configuration de l'imprimante sous Windows NT® 4.095Configuration de DLC sur d'autres systèmes96Autres sources d’information97Gestion à partir du Web98Comment utiliser un navigateur Web pour gérer votre périphérique98Généralités98Comment vous connecter à votre imprimante avec un navigateur99Autres sources d’information99Configuration TCP/IP100Définition des informations TCP/IP100Généralités100Utilisation du panneau de commande de l'imprimante pour attribuer une adresse IP (imprimantes avec panneaux LCD uniquement)101Configuration de l’adresse IP à l’aide de l’application BRAdmin101Configuration de l’adresse IP à l’aide de l’application BRAdmin et du protocole IPX/SPX102Configuration de l’adresse IP à l’aide de l’utilitaire BRAdmin et du protocole TCP/IP103Utilisation de DHCP pour configurer l'adresse IP104Utilisation de APIPA pour configurer l'adresse IP104Utilisation de ARP pour configurer l'adresse IP du serveur d’impression105Configuration de l’adresse IP à l’aide de RARP107Configuration de l’adresse IP à l’aide de BOOTP108Configuration de l’adresse IP à l’aide de BRCONFIG109Modification des paramètres de l’adresse IP par le biais de la console TELNET110Dépistage des anomalies112Généralités112Problèmes d'installation112Problèmes intermittents115Diagnostic des anomalies TCP/IP115Diagnostic des anomalies sous UNIX116Diagnostic des anomalies Windows NT® 4.0/LAN Server (TCP/IP)118Diagnostic des anomalies d’impression Peer to Peer (LPR) sous Windows® 95/98/Me118Diagnostic des anomalies d’impression Peer to Peer sous Windows® 95/98/Me (méthode compatible HP JetAdmin)119Diagnostic des anomalies d’impression Peer to Peer sous Windows® 95/98/Me et Windows NT® 4.0 (NetBIOS)119Diagnostic des anomalies d’impression Brother sur Internet (TCP/IP)120Dépistage des anomalies IPP sous Windows® 95/ 98/Me/2000/XP120Diagnostic des anomalies Novell NetWare121Diagnostic des anomalies AppleTalk122Diagnostic des anomalies DLC/LLC123Diagnostic des anomalies avec le navigateur Web (TCP/IP)123Annexe124Annexe A124Généralités124BRAdmin (recommandé)124Web BRAdmin124HTTP (recommandé)125WebJetAdmin125TELNET125BRCONFIG125Utilisation des services126Général126Rechargement du Firmware du serveur d'impression127Général127Rechargement du firmware à l’aide de BRAdmin128Procédure de rechargement129Rechargement à l’aide du protocole FTP à partir d’une invite de commande130Rechargement à l’aide du protocole FTP à partir d’un navigateur Web131INDEX132Größe: 1010 KBSeiten: 134Language: FrançaisHandbuch öffnen
Anleitung Für Quick SetupInhaltsverzeichnisRéglementations4Prise en main6Eléments fournis6Panneau de commande7CD-ROM fourni8Installation de votre imprimante9Installez les cartouches de toner9Enlevez les goupilles de blocage de tension de l’ensemble de fixage10Installez la cartouche de courroie OPC11Chargez le papier dans le bac12Imprimez une page test13Paramétrage de la langue d’affichage du panneau de commande14Installation du pilote15Windows®15Pour les utilisateurs du câble d’interface USB16Pour les utilisateurs du câble d’interface parallèle18Pour les utilisateurs du câble d’interface réseau20Pour les utilisateurs d’une imprimante réseau peer-to-peer Brother (LPR / NetBIOS)20Pour les utilisateurs d’une imprimante partagée en réseau22Macintosh®15Pour les utilisateurs du câble d’interface USB24Pour les utilisateurs de Mac OS® 8.6 à 9.224Pour les utilisateurs de Mac OS® X 10.1 / 10.227Pour les utilisateurs du câble d’interface réseau29Pour les utilisateurs de Mac OS® 8.6 à 9.229Pour les utilisateurs de Mac OS® X 10.1 / 10.230Pour les administrateurs32Installation de l’utilitaire BRAdmin Professional (Utilisateurs de Windows® uniquement)32Web BRAdmin (Utilisateurs de Windows® uniquement)32Paramétrage de l’adresse IP, du masque de sous- réseau et de la passerelle à l’aide de l’utilitaire BRAdmin Professional (Utilisateurs de Windows® uniquement)33Impression de la page des paramètres de l’imprimante33Paramétrage d’usine33Informations complémentaires34Transport de l’imprimante34Options35Größe: 2,6 MBSeiten: 36Language: FrançaisHandbuch öffnen
Anleitung Für Quick SetupInhaltsverzeichnisVedtekter4Komme i gang6Komponenter6Kontrollpanel7Vedlagt CD-ROM8Installere skriveren9Sette inn tonerkassetten9Fjerne spenningsutløserstiftene i fikseringsenheten10Sette inn OPC-beltekassetten11Legge papir i papirmagasinet12Skriv ut testside13Stille inn språk på kontrollpanelet14Installere driveren15Windows®15For brukere med USB-grensesnittkabel16For brukere med parallellgrensesnittkabel18For brukere med nettverkskabel20For brukere av Brother node-til-node nettverksskriver (LPR/NetBIOS)20For brukere av skriver som deles på nettverk22Macintosh®15For brukere med USB-grensesnittkabel24For brukere av Mac OS® 8.6 til 9.224For brukere av Mac OS® X 10.1 til 10.227For brukere med nettverkskabel29For brukere av Mac OS® 8.6 til 9.229For brukere av Mac OS® X 10.1 til 10.230For administratorer32Installere BRAdmin Professional konfigurasjonsverktøy (kun Windows®-brukere)32Web BRAdmin (kun Windows®-brukere)32Still inn din IP-adresse, nettverksmaske og gateway ved hjelp av BRAdmin Professional (kun Windows®-brukere)33Skriverinnstillingsside33Standard fabrikkinnstilling33Annen informasjon34Transport av skriveren34Tilleggsutstyr35Größe: 2,55 MBSeiten: 36Language: NorskHandbuch öffnen
BetriebsanweisungInhaltsverzeichnisInhalt4Unix-Druck10Mit TCP/IP unter Unix/Linux drucken10Überblick10TCP/IP11Allgemeine TCP/IP UNIX-Hostkonfiguration11Linux-Konfiguration15Linux-Konfiguration mit CUPS15HP-UX-Konfiguration16IBM RS/6000 AIX Konfiguration17Sun Solaris 2.x Konfiguration18SCO UNIX Konfiguration19IBM AS/40020Andere Systeme22Weitere Informationen23TCP/IP-Druck24Unter Windows NT®4.0, Windows® 2000/ XP, LAN Server und Warp Server drucken24Überblick24Windows NT® 4.0 und Windows® 2000/XP (TCP/IP) Konfiguration25Windows® 2000/XP-Druck (Druckertreiber noch nicht installiert)25Druck über Standard-TCP/IP-Port25Windows® 2000/XP-Druck (Druckertreiber bereits installiert)27Windows NT® 4.0 Druck27Windows NT® 4.0 Druck Brother Peer-to-Peer Software installieren28Windows NT® 4.0 Druck Drucker verknüpfen29Windows NT® 4.0 Druck: Zweiten Brother-LPR- Anschluss hinzufügen30Konfiguration von LAN Server/OS/2 Warp Server30Server-Konfiguration30OS/2-Server konfigurieren31Weitere Informationen33Peer-to-Peer-Druck34Peer-to-Peer-Druck in Windows®95/98/ Me-Netzwerken34Überblick34Tipps:34Treiberinstallations-Assistent35TCP/IP-Druck35Brother Peer-to-Peer Software installieren36Drucker verknüpfen37Zweiten Brother-LPR-Anschluss hinzufügen38Weitere Informationen38Peer-to-Peer-Druck NetBIOS39Peer-to-Peer-Druck mit NetBIOS unter Windows® 95/98/Me/2000/XP, Windows NT® 4.0, LAN Server und OS/2 Warp Server39Überblick39PrintServer-Konfiguration40Arbeitsgruppen-/Domänennamen mit TELNET, BRCONFIG oder einem Web-Browser ändern41NetBIOS Port Monitor für Windows® 95/98/Me/ 2000/XP und Windows NT® 4.042Brother NetBIOS Port Monitor installieren42Drucker verknüpfen43Windows® 95/98/Me43Windows NT® 4.0 und Windows® 2000/XP44Zweiten NetBIOS Druckanschluss hinzufügen45Windows® 95/98/Me45Windows NT® 4.0 und Windows® 2000/XP46Konfiguration von LAN Server/OS/2 Warp Server46Serverkonfiguration:46Arbeitsplatzkonfiguration:47Weitere Informationen47Internet-Druck für Windows® konfigurieren48Brother Internet Print installieren48Überblick48Allgemeine Informationen zu Brother Internet Print49Brother Internet Print: Brother-PrintServer konfigurieren50Checkliste für PrintServer-Konfiguration50Brother Internet Print: PrintServer mit BRAdmin konfigurieren51Brother Internet Print: PrintServer mit einem Web- Browser konfigurieren52Brother Internet Print: PrintServer mit TELNET konfigurieren53Brother Internet Print: Installation der BIP- Software unter Windows® 95/98/Me/2000/XP und Windows NT® 4.054Installation von CD-ROM54Zweiten Brother-Internetanschluss hinzufügen57Windows® 2000/XP IPP-Druck57Eine andere URL angeben59Weitere Informationen59Novell NetWare-Druck60Novell NetWare-Druck konfigurieren60Überblick60Allgemeine Informationen61Mit NWADMIN für NetWare 5 einen NDPS-Drucker erzeugen62NDPS-Manager62NDPS-Broker63Druckeragenten erstellen64NetWare 3- und NetWare 4-Systeme konfigurieren65Brother-PrintServer als Warteschlangenserver im Bindery-Emulationsmodus mit BRAdmin konfigurieren65Brother-PrintServer mit BRAdmin als Warteschlangenserver im NDS-Modus konfigurieren67Brother-PrintServer mit Novell NWADMIN und BRAdmin als Warteschlangenserver im NDS- Modus konfigurieren68Brother-PrintServer mit Novell NWADMIN und BRAdmin als dezentralen Drucker im NDS-Modus konfigurieren71Brother-PrintServer mit PCONSOLE und BRCONFIG als Warteschlange im Bindery- Emulation-Modus konfigurieren73Brother-PrintServer mit PCONSOLE und BRCONFIG als Warteschlangenserver im NDS- Modus konfigurieren74Brother-PrintServer konfigurieren Dezentralen Druckermodus mit PCONSOLE und BRCONFIG konfigurieren77Weitere Informationen81Drucken von einem Macintosh®82Druck von einem Macintosh® mittels AppleTalk® und TCP/IP oder der einfachen Netzwerkkonfiguration unter Mac OS® X82Überblick82Macintosh® Konfiguration (Mac OS® 8.6 bis 9.2)84PrintServer wählen (AppleTalk/EtherTalk)85PrintServer wählen (TCP/IP)85Macintosh® Konfiguration (Mac OS® X 10.1/10.2)89PrintServer wählen (AppleTalk/EtherTalk)89PrintServer wählen (TCP/IP)90Druck über einen Macintosh® mittels der einfachen Netzwerkkonfiguration unter Mac OS® X (Mac OS® X 10.2.4 - 10.3 oder neuere Versionen)91Druckertreiber wählen91Konfiguration ändern92Weitere Informationen92DLC-Druck93Druck unter Windows NT® 4.0 oder Windows® 200093Überblick93DLC unter Windows NT® 4.0 und Windows® 2000 konfigurieren93Drucker unter Windows® 2000 einrichten94Drucker unter Windows NT® 4.0 einrichten95DLC auf anderen Systemen konfigurieren96Weitere Informationen97Web-basiertes Management98Management Ihres Gerätes mit einem Web-Browser98Überblick98Mit einem Browser die Verbindung zum Drucker herstellen99Weitere Informationen99TCP/IP Konfiguration100TCP/IP-Informationen zuweisen100Überblick100IP-Adresse über das Funktionstastenfeld des Druckers zuweisen (nur bei Druckern mit LCD- Anzeige)101IP-Adresse mit dem Programm BRAdmin ändern101IP-Adresse mit BRAdmin und dem IPX/SPX- Protokoll einrichten102IP-Adresse mit BRAdmin und dem TCP/IP- Protokoll einrichten103IP-Adresse über DHCP einrichten104IP-Adresse über APIPA konfigurieren104IP-Adresse mit ARP konfigurieren105IP-Adresse über RARP konfigurieren107IP-Adresse über BOOTP konfigurieren108IP-Adresse mit BRCONFIG konfigurieren109IP-Adresse über TELNET-Konsole ändern110Problemlösung112Überblick112Installationsprobleme112Gelegentliche Probleme115Problemlösung für TCP/IP115UNIX-Problemlösung116Problemlösung für Windows NT® 4.0/LAN-Server (TCP/IP)118Problemlösung für Windows® 95/98/Me Peer-to- Peer-Druck (LPR)118Problemlösung für Windows® 95/98/Me Peer-to- Peer-Druck (HP JetAdmin kompatible Methode)119Problemlösung für Windows® 95/98/Me und Windows NT® 4.0 Peer-to-Peer-Druck (NetBIOS)119Problemlösung für Brother Internet Print (TCP/IP)120Problemlösung für Windows® 95/98/Me/2000/XP IPP120Problemlösung für Novell Netware121Problemlösung für AppleTalk122Problemlösung für DLC/LLC123Problemlösung für Web-Browser (TCP/IP)123Anhang124Anhang A124Allgemeine Informationen124BRAdmin (Empfohlen)124Web BRAdmin124HTTP (Empfohlen)125WebJetAdmin125TELNET125BRCONFIG125Mit Diensten arbeiten126Allgemeines126PrintServer-Firmware aktualisieren127Allgemeines127Firmware mit Hilfe von BRAdmin aktualisieren128Aktualisierung129Mit dem FTP-Protokoll über die Eingabeaufforderung aktualisieren130Mit dem FTP-Protokoll von einem Web-Browser aktualisieren131STICHWORTVERZEICHNIS132Größe: 1000 KBSeiten: 134Language: DeutschHandbuch öffnen
BetriebsanweisungInhaltsverzeichnisSommario4Stampa Unix10Stampa da Unix/Linux mediante TCP/IP10Informazioni generali10TCP/IP11Configurazione TCP/IP generale dei computer host UNIX11Configurazione Linux15Configurazione Linux mediante CUPS15Configurazione HP/UX16Configurazione dei sistemi IBM RS/6000 AIX17Configurazione dei sistemi Sun Solaris 2.x18Configurazione di SCO UNIX19IBM AS/40020Altri sistemi22Altre fonti di informazione23Stampa TCP/IP24Stampa da Windows NT®4.0, Windows® 2000/XP, LAN Server e Warp Server24Informazioni generali24Configurazione (TCP/IP) di Windows NT® 4.0 e Windows® 2000/XP25Stampa in Windows® 2000/ XP (driver della stampante non ancora installato)25Stampa sulla porta TCP/IP standard25Stampa in Windows® 2000/XP (driver della stampante già installato)27Stampa da Windows® NT 4.027Stampa da Windows NT® 4.0 Installazione del software Peer-to-peer Brother28Stampa da Windows NT® 4.0 Associazione alla stampante29Stampa da Windows NT® 4.0 Aggiunta di una seconda porta LPR Brother30Configurazione di LAN Server e OS/2 Warp Server30Configurazione del server30Configurazione di un server OS/231Altre fonti di informazione33Stampa Peer-to-peer34Come stampare su una rete Windows® 95/98/Me Peer-to-peer34Informazioni generali34Suggerimenti rapidi:34Driver Deployment Wizard35Stampa TCP/IP35Installazione del software Peer-to-peer Brother36Associazione alla stampante37Aggiunta di una seconda porta LPR Brother38Altre fonti di informazione38Stampa Peer-to-peer NetBIOS39Stampa con NetBIOS in Windows® 95/ 98/Me/2000/XP, Windows NT®4.0, LAN Server e OS/2 Warp Server39Informazioni generali39Configurazione del server di stampa40Modifica del nome del dominio/gruppo di lavoro mediante TELNET o BRCONFIG o un browser Web41NetBIOS Port Monitor per Windows® 95/98/Me/ 2000/XP e Windows NT®4.042Installazione del programma Brother NetBIOS Port Monitor42Associazione alla stampante43Windows® 95/98/Me43Windows NT® 4.0 /Windows® 2000/XP44Aggiunta di una seconda porta di stampa NetBIOS45Windows® 95/98/Me45Windows NT® 4.0 /Windows® 2000/XP46Configurazione dei sistemi LAN Server/OS/2 Warp Server46Configurazione del server:46Configurazione delle workstation:47Altre fonti di informazione47Configurazione della stampa Internet per Windows®48Installazione della stampa Internet48Informazioni generali48Informazioni generali su Stampa Internet Brother49Stampa Internet Brother: configurazione del server di stampa Brother50Elenco di controllo relativo alla configurazione del server di stampa50Stampa Internet Brother: Utilizzo di BRAdmin per configurare il server di stampa51Stampa Internet Brother: Utilizzo di un browser Web per configurare il server di stampa52Stampa Internet Brother: Utilizzo di TELNET per configurare il server di stampa53Stampa Internet Brother: Installazione del software BIP su Windows® 95/98/Me/2000/XP e Windows NT®4.054Installazione dal CD-ROM54Aggiunta di una seconda porta Internet Brother57Stampa IPP da Windows® 2000/XP IPP57Immissione di un altro URL59Altre fonti di informazione59Stampa Novell NetWare60Configurazione della stampa Novell NetWare60Informazioni generali60Informazioni generali61Creazione di una stampante NDPS mediante NWADMIN per NetWare562Gestore NDPS62Broker NDPS63Creazione di un agente stampante64Configurazione dei sistemi NetWare 3 e NetWare 465Configurazione del server di stampa Brother (modalità del server della coda di stampa in modalità di emulazione Bindery) mediante BRAdmin65Configurazione del server di stampa Brother (modalità del server della coda di stampa in modalità NDS) mediante BRAdmin67Configurazione del server di stampa Brother (modalità del server della coda di stampa in modalità NDS) mediante Novell NWADMIN e BRAdmin68Configurazione del server di stampa Brother (modalità della stampante remota in modalità NDS) mediante Novell NWADMIN e BRAdmin71Configurazione del server di stampa Brother (modalità del server della coda di stampa in modalità di emulazione Bindery) mediante PCONSOLE e BRCONFIG73Configurazione del server di stampa Brother (modalità del server della coda di stampa in modalità NDS) mediante PCONSOLE e BRCONFIG74Configurazione del server di stampa Brother (Modalità stampante remota) mediante PCONSOLE e BRCONFIG77Altre fonti di informazione81Stampa da un computer Macintosh®82Stampa da un computer Macintosh® con AppleTalk® e TCP/IP o con funzionalità di configurazione di rete semplice di Mac OS® X82Informazioni generali82Configurazione Macintosh® (Mac OS® 8.6 - 9.2)84Selezione del server di stampa (AppleTalk/EtherTalk)85Selezione del server di stampa (TCP/IP)85Configurazione Macintosh® (Mac OS® X 10.1/10.2)89Selezione del server di stampa (AppleTalk/EtherTalk)89Selezione del server di stampa (TCP/IP)90Stampa da un computer Macintosh® mediante le funzionalità di configurazione di rete semplice di Mac OS® X (Mac OS® X 10.2.4 - 10.3 o versioni successive)91Selezione del server di stampa91Modifica della configurazione92Altre fonti di informazione92Stampa DLC93Stampa da Windows NT®4.0 o Windows® 200093Informazioni generali93Configurazione di DLC su Windows NT®4.0 e Windows® 200093Impostazione della stampante in Windows® 200094Impostazione della stampante in Windows NT®4.095Configurazione di DLC su altri sistemi96Altre fonti di informazione97Gestione basata sul Web98Utilizzo di un browser Web per gestire la periferica98Informazioni generali98Connessione della stampante mediante un browser99Altre fonti di informazione99Configurazione TCP/IP100Assegnazione delle informazioni relative a TCP/IP100Informazioni generali100Utilizzo del pannello anteriore della stampante per assegnare un indirizzo IP (solo stampanti con pannelli LCD)101Modifica dell'indirizzo IP mediante l'utility BRAdmin101Utilizzo di BRAdmin e del protocollo IPX/SPX per impostare l'indirizzo IP102Utilizzo di BRAdmin e del protocollo TCP/IP per impostare l'indirizzo IP103Utilizzo di DHCP per configurare l'indirizzo IP104Utilizzo di APIPA per configurare l'indirizzo IP104Utilizzo di ARP per configurare l'indirizzo IP del server di stampa105Utilizzo del protocollo RARP per configurare l'indirizzo IP107Utilizzo del protocollo BOOTP per configurare l'indirizzo IP108Configurazione dell'indirizzo IP con BRCONFIG109Modifica delle impostazioni dell'indirizzo IP con la console TELNET110Risoluzione dei problemi112Informazioni generali112Problemi relativi all'installazione112Problemi occasionali115Risoluzione dei problemi relativi al protocollo TCP/IP115Risoluzione dei problemi relativi a UNIX116Risoluzione dei problemi relativi a Windows NT®4.0/LAN Server (TCP/IP)118Risoluzione dei problemi relativi alla stampa Peer- to-peer (LPR) in Windows 95/98/Me118Risoluzione dei problemi relativi alla stampa Peer- to-peer in Windows® 95/98/Me (metodo HP JetAdmin compatibile)119Risoluzione dei problemi relativi alla stampa Peer- to-peer in Windows® 95/98/Me e Windows NT®4.0 (NetBIOS)119Risoluzione dei problemi relativi alla stampa Internet Brother (TCP/IP)120Risoluzione dei problemi relativi a IPP di Windows® 95/98/Me/2000/XP120Risoluzione dei problemi relativi a Novell NetWare121Risoluzione dei problemi relativi a AppleTalk122Risoluzione dei problemi relativi a DLC/LLC123Risoluzione dei problemi relativi al browser Web (TCP/IP)123Appendice124Appendice A124Informazioni generali124BRAdmin (consigliato)124Web BRAdmin124HTTP (consigliato)125WebJetAdmin125TELNET125BRCONFIG125Utilizzo dei servizi126Generale126Ricaricamento del firmware del server di stampa127Generale127Ricaricamento del firmware mediante BRAdmin128Processo di ricaricamento129Ricaricamento mediante il protocollo FTP dal prompt dei comandi130Ricaricamento mediante il protocollo FTP da un browser Web131INDICE132Größe: 1010 KBSeiten: 134Language: ItalianoHandbuch öffnen
BetriebsanweisungInhaltsverzeichnisÍndice4Impressão em Unix10Imprimir em Unix/Linux com TCP/IP10Descrição geral10TCP/IP11Configuração TCP/IP geral num sistema anfitrião UNIX11Configuração em Linux15Configuração em Linux utilizando o CUPS15Configuração em HP-UX16Configuração em AIX RS/6000 da IBM17Configuração em Sun Solaris 2.x18Configuração em SCO UNIX19AS/400 da IBM20Outros sistemas22Outras fontes de informação23Impressão TCP/IP24Imprimir em Windows NT®4.0, Windows® 2000/XP, LAN Server e Warp Server24Descrição geral24Configuração em Windows NT®4.0 e Windows® 2000/XP (TCP/IP)25Impressão em Windows® 2000/XP (Controlador de impressão ainda não instalado)25Impressão por porta TCP/IP padrão25Impressão em Windows® 2000/XP (Controlador de impressão já instalado)27Impressão em Windows NT® 4.027Impressão em Windows NT®4.0 Instalar o software ponto-a-ponto da Brother28Impressão em Windows NT®4.0 Associar a impressora29Impressão em Windows NT®4.0 Adicionar outra porta LPR Brother30Configuração em LAN Server, OS/2 Warp Server30Configuração do servidor30Configuração de um servidor OS/231Outras fontes de informação33Impressão ponto-a-ponto34Como imprimir numa rede ponto-a-ponto Windows® 95/98/Me34Descrição geral34Sugestões:34Assistente de instalação do controlador35Impressão TCP/IP35Instalar o software ponto-a-ponto da Brother36Associar a impressora37Adicionar outra porta LPR Brother38Outras fontes de informação38Impressão ponto-a-ponto NetBIOS39Como imprimir utilizando o NetBIOS no Windows® 95/98/Me/2000/XP, Windows NT®4.0, LAN Server e OS/2 Warp Server39Descrição geral39Configuração do servidor de impressão40Alterar o nome do grupo de trabalho/domínio utilizando o TELNET ou BRCONFIG ou um web browser41NetBIOS Port Monitor para Windows® 95/98/Me/ 2000/XP e Windows NT®4.042Instalar o Brother NetBIOS Port Monitor42Associar a impressora43Windows® 95/98/Me43Windows NT® 4.0 /Windows® 2000/XP44Adicionar outra porta de impressão NetBIOS45Windows® 95/98/Me45Windows NT® 4.0 /Windows® 2000/XP46Configuração em LAN Server/OS/2 Warp Server46Configuração do servidor:46Configuração da estação de trabalho47Outras fontes de informação47Configurar a impressão via Internet para Windows®48Instalação do software de impressão via Internet48Descrição geral48Informações gerais sobre a impressão via Internet da Brother49Impressão via Internet da Brother: Configurar o servidor de impressão Brother50Lista de verificação para configuração do servidor de impressão50Impressão via Internet da Brother: Utilizar o BRAdmin para configurar o servidor de impressão51Impressão via Internet da Brother: Utilizar um web browser para configurar o servidor de impressão52Impressão via Internet da Brother: Utilizar o TELNET para configurar o servidor de impressão53Impressão via Internet da Brother: Instalar o software BIP no Windows® 95/98/Me/2000/XP e Windows NT®4.054Configuração a partir do CD-ROM54Adicionar outra porta de Internet Brother57Impressão IPP em Windows® 2000/XP57Especificar outro URL59Outras fontes de informação59Impressão em Novell NetWare60Como configurar a impressão em Novell NetWare60Descrição geral60Informações gerais61Criar uma impressora NDPS com o NWADMIN para NetWare 562NDPS Manager62NDPS Broker63Criar um agente de impressora64Configurar sistemas NetWare 3 e NetWare 465Configurar o servidor de impressão Brother (modo servidor de filas no modo de emulação de ligação) utilizando o BRAdmin65Configurar o servidor de impressão Brother (modo servidor de filas no modo NDS) utilizando o BRAdmin67Configurar o servidor de impressão Brother (modo servidor de filas no modo NDS) utilizando o Novell NWADMIN e o BRAdmin68Configurar o servidor de impressão Brother (modo impressora remota no modo NDS) utilizando o Novell NWADMIN e o BRAdmin71Configurar o servidor de impressão Brother (modo servidor de filas no modo de emulação de ligação) utilizando o PCONSOLE e o BRCONFIG73Configurar o servidor de impressão Brother (modo servidor de filas no modo NDS) utilizando o PCONSOLE e o BRCONFIG74Configurar o servidor de impressão Brother (Modo Impressora remota) utilizando o PCONSOLE e o BRCONFIG77Outras fontes de informação81Imprimir a partir de um Macintosh®82Imprimir a partir de um Macintosh® utilizando AppleTalk®e TCP/IP ou a funcionalidade de Configuração de rede simples no Mac OS® X82Descrição geral82Configuração em Macintosh® (Mac OS® 8.6 a 9.2)84Como seleccionar o servidor de impressão (AppleTalk/EtherTalk)85Como seleccionar o servidor de impressão (TCP/IP)85Configuração em Macintosh® (Mac OS® X 10.1/10.2)89Como seleccionar o servidor de impressão (AppleTalk/EtherTalk)89Como seleccionar o servidor de impressão (TCP/IP)90Imprimir a partir de um Macintosh® utilizando a funcionalidade de Configuração de rede simples no Mac OS® X (Mac OS® X 10.2.4 - 10.3 ou superior)91Como seleccionar o controlador de impressora91Alterar a configuração92Outras fontes de informação92Impressão DLC93Imprimir em Windows NT®4.0 ou Windows® 200093Descrição geral93Configurar o DLC em Windows NT® 4.0 e Windows® 200093Configuração da impressora em Windows® 200094Configuração da impressora em Windows NT®4.095Configurar o DLC noutros sistemas96Outras fontes de informação97Gestão baseada na web98Como utilizar um web browser para gerir o dispositivo98Descrição geral98Como ligar-se à impressora através de um browser99Outras fontes de informação99Configuração TCP/IP100Atribuir informações TCP/IP100Descrição geral100Utilizar o painel de controlo da impressora para atribuir um endereço IP (apenas impressoras com painel LCD)101Alterar o endereço IP utilizando o BRAdmin101Utilizar o BRAdmin e o protocolo IPX/SPX para definir o endereço IP102Utilizar o BRAdmin e o protocolo TCP/IP para definir o endereço IP103Utilizar o DHCP para configurar o endereço IP104Utilizar o APIPA para configurar o endereço IP104Utilizar o ARP para configurar o endereço IP do servidor de impressão105Utilizar o RARP para configurar o endereço IP107Utilizar o BOOTP para configurar o endereço IP108Configurar o endereço IP com o BRCONFIG109Alterar as definições de endereço IP com a consola TELNET110Resolução de problemas112Descrição geral112Problemas de instalação112Problemas intermitentes115Resolução de problemas de TCP/IP115Resolução de problemas em UNIX116Resolução de problemas em Windows NT®4.0/ LAN Server (TCP/IP)118Resolução de problemas de impressão ponto-a- ponto (LPR) em Windows® 95/98/Me118Resolução de problemas de impressão ponto-a- ponto (método compatível com HP JetAdmin) em Windows® 95/98/Me119Resolução de problemas de impressão ponto-a- ponto (NetBIOS) em Windows® 95/98/Me e Windows NT®4.0119Resolução de problemas de impressão via Internet da Brother (TCP/IP)120Resolução de problemas de IPP em Windows® 95/ 98/Me/2000/XP120Resolução de problemas em Novell NetWare121Resolução de problemas de AppleTalk122Resolução de problemas de DLC/LLC123Resolução de problemas no web bowser (TCP/IP)123Anexo124Anexo A124Informações gerais124BRAdmin (Recomendado)124Web BRAdmin124HTTP (Recomendado)125WebJetAdmin125TELNET125BRCONFIG125Utilizar os serviços126Geral126Recarregar o firmware do servidor de impressão127Geral127Recarregar o firmware utilizando o BRAdmin128Processo de recarregamento129Recarregar utilizando o protocolo FTP a partir de uma linha de comandos130Recarregar utilizando o protocolo FTP a partir de um web browser131Índice remissivo132Größe: 1020 KBSeiten: 134Language: PortuguêsHandbuch öffnen
BetriebsanweisungInhaltsverzeichnisWarnungen, Hinweise und Anmerkungen2Der sichere Betrieb des Druckers3Hinweise für optimale Druckqualität5Internet-Adressen7Wichtige Informationen: Vorschriften8Funkentstörung (Nur 220-240 Volt Modell)8Konformitätserklärung für das Internationale ENERGY STAR® Programm9IEC 60825 Spezifikation (Nur 220-240 Volt Modell)10WICHTIG: Ihrer Sicherheit zuliebe11Geräuschemission (Nur für Deutschland)11Warenzeichen12Hinweise zu diesem Benutzerhandbuch12Versand/Transport des Druckers12Inhaltsverzeichnis14Allgemeine Beschreibung des Druckers18Lieferumfang18Vorderansicht20Rückansicht21Eigenschaften222400 DPI Auflösung22Hochgeschwindigkeits- und Laserfarbdruck22Color Advanced Photoscale Technology (CAPT)22High Resolution Control (Hi-R)22Wartungsfreie und wirtschaftliche Tonerkassette22Universalkassette22Drei Schnittstellen22Automatische Schnittstellenauswahl23Allgemeines zu den Emulationsmodi23Automatische Emulationsauswahl23Datenkompressionstechnologie23Schriften23Funktionstastenfeldsperre24Stromsparmodus24Tonersparmodus24Reprint-Einstellung24Netzwerk24Drucker aufstellen25Stromversorgung25Standort25Geeignete Papierarten27Papiergröße und -art27Geeignete Papierarten27Empfohlenes Papier29Bedruckbarer Bereich30Hochformat30Querformat30Richtlinien zur Papierauswahl31Umschläge32Etiketten und Folien34Papiereinzug35Papiereinzug35Manuelle Zufuhr36Papierausgabe36Treiber und Software37Druckertreiber37Für Windows®38Eigenschaften des PCL -Druckertreibers38Registerkarte Grundeinstellungen38Registerkarte Erweitert39Registerkarte Zubehör44Registerkarte Support45Eigenschaften des PS-Druckertreibers46Registerkarte Anschlüsse46Registerkarte Geräteeinstellungen47Registerkarte Layout48Registerkarte Papier/Qualität49Erweiterte Optionen50Für Macintosh®52Software54Software für Netzwerke54BRAdmin Professional54Driver Deployment Wizard54Web BRAdmin54Automatische Emulationsauswahl55Automatische Schnittstellenauswahl56Druckereinstellungen56Werkseitige Voreinstellungen56Funktionstastenfeld57Funktionstastenfeld57Tasten58Go-Taste59Abbruchtaste (Job Cancel)59+ oder - Taste59Zum Durchblättern der Menüs auf dem Display59Die Eingabe von Zahlen59Set-Taste60Back-Taste60LED-Anzeigen (LEDs)61LCD-Anzeige (Liquid Crystal Display)62Display-Meldungen62Druckerstatusmeldungen63Benutzung des Funktionstastenfeldes63Das Display-Menü65Datum und Uhrzeit einstellen75IP-Adresse einstellen76Allgemeines zu den Emulationsmodi77Liste der werkseitigen Voreinstellungen78Voreinstellungen für den Netzwerkbetrieb78Reprint-Einstellung82Reprint über RAM-Speicher82Die Reprint-Funktion83DRUCK & SPEICHER Daten drucken84SPEICHER-Daten drucken84SICHERE Daten drucken85Keine Daten für die Druckwiederholung im Speicher87Druckauftrag löschen87Zu wiederholenden Druckauftrag stornieren87Sonderzubehör88Sonderzubehör und Verbrauchsmaterial88Optionale Papierzuführung (LT-27CL)88Legal-Kassette (LT-27LG)88Duplexeinheit (DX-2700)88CompactFlash®-Karte88SO-DIMM-Speicher88Optionale Schriften88Optionale Papierzuführung (LT-27CL)89Papier in die optionale Papierzuführung einlegen89Die Installation der optionalen Papierzuführung89Legal-Kassette (LT-27LG)92Die Installation der Legal-Kassette92Duplexeinheit (DX-2700)94Die Installation der Duplexeinheit94Richtlinien für den doppelseitigen Druck97Richtlinien für den doppelseitigen Druck97CompactFlash®-Karte98CompactFlash®-Karte einsetzen99SO-DIMM100Zusätzlichen Speicher installieren101Optionale Schriften103Optionale Schriften (BS-3000)103Optionale Barcode Font-Bibiliothek (BT-1000)103Schrift auf der Schriftkarte auswählen103Routinewartung105Verbrauchsmaterialien ersetzen105Tonerkassetten108Meldung „Toner fast leer“108Wartungsmeldung TONER LEER108Tonerkassetten ersetzen109Toner-Abfallbehälter112Meldung „Toner-Abfallbehälter voll“112Toner-Abfallbehälter austauschen113OPC-Bandkassette114Meldung „OPC-Bandkassette ersetzen“114OPC-Bandkassette ersetzen114Fixiereinheit117Meldung „Fixiereinheit ersetzen“117Fixiereinheit ersetzen118120K Kit120Transferbandreiniger ersetzen120Transferrolle ersetzen122Reinigung125Außenreinigung des Druckers126Innenreinigung des Druckers127Transport des Druckers132Problemlösung133Display-Meldungen133Fehlermeldungen133Wartungsmeldungen135Servicemeldungen136Papierstau beseitigen139STAU A1 / STAU A2 (Stau in der Papierkassette)140STAU B (Papierstau am Eingang der Fixierrolle)141STAU C (Papierstau am Papierausgang)143STAU D (Papierstau unten in der Duplexeinheit)145STAU E (Papierstau oben in der Duplexeinheit)146Druckqualität verbessern148PROBLEME UND ABHILFE153Hardware einrichten153Drucker einrichten154Papiermanagement155Druck156Anhang157Technische Daten157Druck157Eigenschaften158Elektrik und Mechanik159Papierspezifikationen160Papiermanagement160Spezifikation der Druckmedien160INDEX161Größe: 2,93 MBSeiten: 162Language: DeutschHandbuch öffnen
Anleitung Für Quick SetupInhaltsverzeichnisBestemmelser4Sådan kommer du i gang6Kassens indhold6Kontrolpanel7Medfølgende cd-rom8Opsætning af printeren9Installer tonerpatronerne9Fjern udløserstifterne på varmestationsenheden10Installer OPC-rem-kassetten11Læg papir i papirbakken12Udskriv en testside13Indstil sprog på kontrolpanelet14Installation af driveren15Windwos®15For brugere af USB-interfacekabler16For brugere af parallelle interfacekabler18For brugere af netværksinterfacekabler20For brugere af Brother Peer-to-Peer- netværksprintere (LPR/NetBIOS)20For brugere af delte netværksprintere22Macintosh®15For brugere af USB-interfacekabler24For brugere af Mac OS® X 10.1 / 10.227For brugere af Mac OS® 8.6 til 9.224For brugere af netværksinterfacekabler29For brugere af Mac OS® X 10.1 / 10.230For brugere af Mac OS® 8.6 til 9.229For administratorer32Installation af BRAdmin Professional (kun Windows®-brugere)32Web BRAdmin (kun Windows®-brugere)32Indstilling af IP-adresse, undernetmaske og gateway vha. hjælpeprogrammet BRAdmin Professional (kun Windows®-brugere)33Udskrivning af printerens indstillinger33Fabriksindstilling33Andre oplysninger34Forsendelse af printeren34Ekstraudstyr35Größe: 2,54 MBSeiten: 36Language: DanskHandbuch öffnen
Anleitung Für Quick SetupInhaltsverzeichnisNormative4Nozioni preliminari6Contenuto della confezione6Pannello di controllo7CD-ROM8Installazione della stampante9Installare le cartucce toner9Rimuovere i piedini di rilascio dall'unità di fusione10Installare la cartuccia della cinghia OPC11Caricare la carta nel vassoio carta12Stampare una pagina di prova13Impostare la lingua sul pannello di controllo14Installazione del driver15Windows®15Per gli utenti che utilizzano un cavo di interfaccia USB16Per gli utenti che utilizzano un cavo di interfaccia parallela18Per gli utenti che utilizzano un cavo di interfaccia di rete20Per gli utenti di stampanti di rete Peer-to-Peer Brother (LPR / NetBIOS)20Per gli utenti di stampanti di rete condivise22Macintosh®15Per gli utenti che utilizzano un cavo di interfaccia di rete29Per gli utenti di Mac OS® X 10.1 - 10.227Per gli utenti di Mac OS® 8.6 - 9.224Per gli utenti che utilizzano un cavo di interfaccia USB24Per gli utenti di Mac OS® 8.6 - 9.229Per gli utenti di Mac OS® X 10.1 - 10.230Per gli amministratori32Installazione dell'utility BRAdmin Professional (solo per utenti di Windows®)32Web BRAdmin (solo per utenti di Windows®)32Impostazione dell'indirizzo IP, della subnet mask e del gateway mediante l'utility BRAdmin Professional (solo per utenti di Windows®)33Stampa della pagina delle impostazioni della stampante33Impostazioni predefinite in fabbrica33Ulteriori informazioni34Trasporto della stampante34Accessori opzionali35Größe: 2,55 MBSeiten: 36Language: ItalianoHandbuch öffnen
Anleitung Für Quick SetupInhaltsverzeichnisRegulamentos4Como começar6Componentes da caixa6Painel de controlo7CD-ROM fornecido8Configurar a impressora9Instalar os cartuchos de toner9Remover os pinos de desbloqueio da tensão da unidade do fusor10Instalar o cartucho da correia OPC11Colocar papel na bandeja12Imprimir uma página de teste13Definir o idioma do painel de controlo14Instalar o controlador15Windows®15Utilizadores de cabo de interface USB16Utilizadores de cabo de interface paralela18Utilizadores de cabo de interface de rede20Utilizadores de impressoras de rede Brother ponto-a-ponto (LPR/NetBIOS)20Utilizadores de impressoras partilhadas em rede22Macintosh®15Utilizadores de cabo de interface USB24Utilizadores de Mac OS® 8.6 a 9.224Utilizadores de Mac OS® X 10.1 / 10.227Utilizadores de cabo de interface de rede29Utilizadores de Mac OS® 8.6 a 9.229Utilizadores de Mac OS® X 10.1 / 10.230Para administradores32Instalar o utilitário BRAdmin Professional (apenas para utilizadores de Windows®)32Web BRAdmin (apenas para utilizadores de Windows®)32Configurar o endereço IP, máscara de sub-rede e gateway utilizando o utilitário BRAdmin Professional (apenas para utilizadores de Windows®)33Imprimir a página de definições da impressora33Predefinição de fábrica33Outras informações34Transporte da impressora34Opções35Größe: 2,55 MBSeiten: 36Language: PortuguêsHandbuch öffnen
Anleitung Für Quick SetupInhaltsverzeichnisSicherer Druckerbetrieb3Vorschriften4Erste Schritte5Lieferumfang5Funktionstastenfeld6Beiliegende CD7Drucker aufstellen8Tonerkassetten einsetzen8Spannungsstifte der Fixiereinheit entfernen9OPC-Bandkassette einsetzen10Papier in die Papierkassette einlegen11Testseite drucken12Einstellen der Sprache mit dem Funktionstastenfeld13Treiber installieren14Windows®14USB-Anschluss15Parallelanschluss17Netzwerkanschluss19Brother Peer-to-Peer Netzwerkdrucker (LPR / NetBIOS)19Über das Netzwerk gemeinsam benutzte Drucker21Macintosh®14USB-Anschluss23Mac OS® 8.6 bis 9.223Für Mac OS® X 10.1 / 10.226Netzwerkanschluss28Mac OS® 8.6 bis 9.228Für Mac OS® X 10.1 / 10.229Für Administratoren31Das Konfigurationsprogramm BRAdmin Professional installieren (nur Windows®-Benutzer)31Web BRAdmin (nur Windows®-Benutzer)31IP-Adresse, Subnetzmaske und Gateway mit BRAdmin Professional einrichten (Nur für Windows®-Benutzer)32Ausdruck der Druckereinstellungen32Werkseitige Voreinstellungen32Sonstige Informationen33Versand/Transport des Druckers33Sonderzubehör34Größe: 2,53 MBSeiten: 35Language: DeutschHandbuch öffnen
BetriebsanweisungInhaltsverzeichnisÍndice de materias4Impresión en Unix10Impresión desde Unix/Linux utilizando TCP/IP10Visión general10TCP/IP11Configuración general del anfitrión UNIX TCP/IP11Configuración de Linux15Configuración de Linux utilizando CUPS15Configuración de HP-UX16Configuración de IBM RS/6000 AIX17Configuración de Sun Solaris 2.x18Configuración de SCO UNIX19IBM AS/40020Otros sistemas22Otras fuentes de información23Impresión a través de TCP/IP24Impresión desde Windows NT® 4.0, Windows® 2000/XP, LAN Server y Warp Server24Visión general24Configuración bajo Windows NT® 4.0 y Windows® 2000/XP (TCP/IP)25Impresión bajo Windows® 2000/XP (sin el controlador de impresora instalado)25Impresión a través del puerto TCP/IP estándar25Impresión bajo Windows® 2000/XP (con el controlador de impresora instalado)27Impresión bajo Windows NT® 4.027Impresión bajo Windows NT® 4.0: Instalación del software punto a punto de Brother28Impresión bajo Windows NT® 4.0: Asociación a la impresora29Impresión bajo Windows NT® 4.0: Adición de un segundo puerto LPR de Brother30Configuración para OS/2 Warp Server y LAN Server30Configuración del servidor30Configuración de OS/2 Server31Otras fuentes de información33Impresión punto a punto34Impresión en una red punto a punto bajo Windows® 95/98/Me34Visión general34Sugerencias rápidas:34Asistente de despliegue del controlador35Impresión a través de TCP/IP35Instalación del software punto a punto de Brother36Asociación a la impresora37Adición de un segundo puerto LPR de Brother38Otras fuentes de información38Impresión punto a punto NetBIOS39Impresión utilizando NetBIOS bajo Windows® 95/98/Me/NT/2000/XP, Windows NT® 4.0, LAN Server y OS/2 Warp Server39Visión general39Configuración del servidor de impresión40Cambio del nombre del grupo de trabajo/dominio mediante TELNET, BRCONFIG o un navegador Web41Monitor de puerto NetBIOS para Windows® 95/98/ Me/2000/XP y Windows NT® 4.042Instalación del monitor de puerto NetBIOS de Brother42Asociación de la impresora43Windows® 95/98/Me43Windows NT® 4.0 /Windows® 2000/XP44Adición de un segundo puerto de impresión NetBIOS45Windows® 95/98/Me45Windows NT® 4.0 /Windows® 2000/XP46Configuración de OS/2 Warp Server/LAN Server46Configuración del servidor:46Configuración de la estación de trabajo:47Otras fuentes de información47Configuración de la impresión vía Internet para Windows®48Instalación de impresión vía Internet48Visión general48Información general de la impresión vía Internet de Brother49Impresión vía Internet de Brother: configuración del servidor de impresión Brother50Lista de comprobación de la configuración del servidor de impresión50Impresión vía Internet de Brother: utilización de BRAdmin para configurar el servidor de impresión51Impresión vía Internet de Brother: utilización de un navegador Web para configurar el servidor de impresión52Impresión vía Internet de Brother: utilización de TELNET para configurar el servidor de impresión53Impresión vía Internet de Brother: instalación del software BIP bajo Windows® 95/98/Me/2000/XP y Windows NT® 4.054Instalación desde CD-ROM54Adición de un segundo puerto Internet de Brother57Impresión IPP bajo Windows® 2000/XP57Especificación de un URL diferente59Otras fuentes de información59Impresión bajo Novell NetWare60Cómo configurar la impresión bajo Novell NetWare60Visión general60Información general61Creación de una impresora NDPS utilizando NWADMIN para NetWare 562Administrador NDPS62Broker NDPS63Creación de un agente de impresora64Configuración de sistemas NetWare 3 y NetWare 465Configuración del servidor de impresión Brother (modo servidor de cola en modo de emulación Enlace) mediante BRAdmin65Configuración del servidor de impresión Brother (modo servidor de cola en modo NDS) mediante BRAdmin67Configuración del servidor de impresión Brother (modo servidor de cola en modo NDS) mediante NWADMIN de Novell y BRAdmin68Configuración del servidor de impresión Brother (modo de impresora remota en modo NDS) mediante NWADMIN de Novell y BRAdmin71Configuración del servidor de impresión Brother (modo servidor de cola en modo de emulación Enlace) mediante PCONSOLE y BRCONFIG73Configuración del servidor de impresión Brother (modo servidor de cola en modo NDS) mediante PCONSOLE y BRCONFIG74Configuración del servidor de impresión Brother (modo de impresora remota) utilizando PCONSOLE y BRCONFIG77Otras fuentes de información81Impresión desde un Macintosh®82Impresión desde Macintosh® por medio de AppleTalk® y TCP/IP o la capacidad de configuración simple de red de Mac OS® X82Visión general82Configuración de Macintosh® (Mac OS® 8.6 a 9.2)84Cómo seleccionar el servidor de impresión (AppleTalk/EtherTalk)85Selección del servidor de impresión (TCP/IP)85Configuración de Macintosh® (Mac OS® X 10.1/10.2)89Cómo seleccionar el servidor de impresión (AppleTalk/EtherTalk)89Selección del servidor de impresión (TCP/IP)90Impresión desde Macintosh® por medio de la capacidad de configuración simple de red de Mac OS® X (Mac OS® X 10.2.4 - 10.3 o posterior)91Selección del controlador de impresora91Cambio de la configuración92Otras fuentes de información92Impresión a través de DLC93Impresión desde Windows NT® 4.0 o Windows® 200093Visión general93Configuración de DLC en Windows NT® 4.0 y Windows® 200093Configuración de la impresora bajo Windows® 200094Configuración de la impresora bajo Windows NT® 4.095Configuración de DLC en otros sistemas96Otras fuentes de información97Administración basada en Web98Utilización de navegadores Web para administrar dispositivos98Visión general98Conexión de la impresora mediante un navegador99Otras fuentes de información99Configuración de TCP/IP100Asignación de información de TCP/IP100Visión general100Utilización del panel de control de la impresora para asignar una dirección IP (sólo para impresoras con paneles LCD)101Cambio de la dirección IP mediante la aplicación BRAdmin101Utilización de BRAdmin y el protocolo IPX/SPX para establecer la dirección IP102Utilización de BRAdmin y el protocolo TCP/IP para establecer la dirección IP103Utilización de DHCP para configurar la dirección IP104Utilización de APIPA para configurar la dirección IP104Utilización de ARP para configurar la dirección IP del servidor de impresión105Utilización de RARP para configurar la dirección IP107Utilización de BOOTP para configurar la dirección IP108Configuración de la dirección IP con BRCONFIG109Modificación de la configuración de la dirección IP mediante la consola TELNET110Solución de problemas112Visión general112Problemas de instalación112Problemas intermitentes115Solución de problemas de TCP/IP115Solución de problemas de UNIX116Solución de problemas de Windows NT® 4.0/LAN Server (TCP/IP)118Solución de problemas de la impresión punto a punto (LPR) de Windows® 95/98/Me118Solución de problemas de punto a punto (método compatible con JetAdmin de HP) en Windows® 95/98/Me119Solución de problemas de la impresión punto a punto (NetBIOS) de Windows® 95/98/Me y Windows NT® 4.0119Solución de problemas de Impresión vía Internet de Brother (TCP/IP)120Solución de problemas de IPP de Windows® 95/98/Me/2000/XP120Solución de problemas de Novell NetWare121Solución de problemas de AppleTalk122Solución de problemas de DLC/LLC123Solución de problemas del navegador Web (TCP/IP)123Apéndice124Apéndice A124Información general124BRAdmin (opción recomendada)124Web BRAdmin124HTTP (opción recomendada)125WebJetAdmin125TELNET125BRCONFIG125Utilización de servicios126General126Recarga del firmware del servidor de impresión127General127Recarga de firmware utilizando BRAdmin128Proceso de recarga129Recarga utilizando el protocolo FTP desde el símbolo del sistema130Recarga utilizando el protocolo FTP desde un navegador Web131ÍNDICE132Größe: 1010 KBSeiten: 134Language: EspañolHandbuch öffnen
Anleitung Für Quick SetupInhaltsverzeichnisNormativas4Procedimientos iniciales6Componentes en la caja6Panel de control7CD-ROM suministrado8Configuración de la impresora9Instalación de los cartuchos de tóner9Retire las clavijas de liberación de tensión de la unidad de fusión10Instalación del cartucho de correa OPC11Carga del papel en la bandeja de papel12Impresión de una página de prueba13Establecimiento de idiomas en el panel de control14Instalación del controlador15Windows®15Para usuarios de cables de interfaz USB16Para usuarios de impresoras de red compartidas22Para usuarios de cables de interfaz de red20Para usuarios de cables de interfaz paralelo18Para usuarios del modo de impresora de red punto a punto de Brother (LPR / NetBIOS)20Macintosh®15Para usuarios de cables de interfaz USB24Para usuarios de Mac OS® 8.6 a 9.224Para usuarios de Mac OS® X 10.1 a 10.227Para usuarios de cables de interfaz de red29Para usuarios de Mac OS® 8.6 a 9.229Para usuarios de Mac OS® X 10.1 a 10.230Para administradores32Instalación de la utilidad BRAdmin Professional (sólo para usuarios de Windows®)32Web BRAdmin (sólo para usuarios de Windows®)32Configuración de la dirección IP, la máscara de subred y la puerta de acceso con la utilidad BRAdmin Professional (sólo para usuarios de Windows®)33Impresión de la página de configuración de la impresora33Valores predeterminados de fábrica33Otra información34Transporte de la impresora34Opciones35Größe: 2,57 MBSeiten: 36Language: EspañolHandbuch öffnen
Anleitung Für Quick SetupInhaltsverzeichnisReguleringen4Aan de slag6Onderdelen in de doos6Het bedieningspaneel7Meegeleverde cd-rom8De printer installeren9De tonercartridges plaatsen9De spanningspennen van de fuser verwijderen10De cassette met de OPC-riem installeren11Papier in de papierlade plaatsen12Een testpagina afdrukken13De taal van de meldingen op het bedieningspaneel instellen14De driver installeren15Windows®15Bij gebruik van de USB-interfacekabel16Bij gebruik van de parallelle interfacekabel18Bij gebruik van de netwerkinterfacekabel20Bij gebruik van een Brother peer-to-peer netwerkprinter (LPR / NetBIOS)20Bij gebruik van een printer die op een netwerk wordt gedeeld22Macintosh®15Bij gebruik van de USB-interfacekabel24Bij gebruik van Mac OS® 8.6 t/m 9.224Bij gebruik van Mac OS® X 10.1 / 10.227Bij gebruik van de netwerkinterfacekabel29Bij gebruik van Mac OS® 8.6 t/m 9.229Bij gebruik van Mac OS® X 10.1 / 10.230Voor beheerders32Het hulpprogramma BRAdmin Professional installeren (alleen bij gebruik van Windows®)32Web BRAdmin (alleen bij gebruik van Windows®)32IP-adres, subnetmasker en gateway instellen met gebruikmaking van BRAdmin Professional (alleen bij gebruik van Windows®)33Pagina met printer- instellingen afdrukken33Fabrieksinstellingen terugstellen33Andere informatie34Vervoer van de printer34Toebehoren35Größe: 2,54 MBSeiten: 36Language: NederlandsHandbuch öffnen
BetriebsanweisungInhaltsverzeichnisInhoudsopgave4Afdrukken op Unix-systemen10Afdrukken op Unix/Linux-systemen via TCP/IP10Overzicht10TCP/IP11TCP/IP UNIX-host configureren11Linux configureren15Linux configureren met gebruikmaking van CUPS15HP-UX configureren16IBM RS/6000 AIX configureren17Sun Solaris 2.x configureren18SCO UNIX configureren19IBM AS/40020Andere systemen22Andere bronnen van informatie23Afdrukken via TCP/IP24Afdrukken vanaf Windows NT® 4.0, Windows® 2000/XP, LAN Server en Warp Server24Overzicht24Windows NT® 4.0 en Windows® 2000/XP (TCP/IP) configureren25Afdrukken vanaf Windows® 2000/XP (printerdriver nog niet geïnstalleerd)25Afdrukken via de standaard TCP/IP-poort25Afdrukken vanaf Windows® 2000/XP (printerdriver is geïnstalleerd)27Afdrukken vanaf Windows NT® 4.027Afdrukken vanaf Windows NT® 4.0: De software Brother Peer to Peer Print installeren28Afdrukken vanaf Windows NT® 4.0: Aan de printer koppelen29Afdrukken vanaf Windows NT® 4.0: Een tweede Brother LPR-poort toevoegen30LAN Server, OS/2 Warp Server configureren30De server configureren30Een OS/2-server configureren31Andere bronnen van informatie33Peer to Peer Print34Afdrukken in een peer-to-peer netwerk voor Windows® 95/98/Me34Overzicht34Tips en hints:34De Driver Deployment Wizard35Afdrukken via TCP/IP35De software Brother Peer to Peer Print installeren36Aan de printer koppelen37Een tweede Brother LPR-poort toevoegen38Andere bronnen van informatie38Peer-to-peer afdrukken via NetBIOS39Afdrukken via NetBIOS op Windows® 95/98/Me/2000/XP, Windows NT® 4.0, LAN Server en OS/2 Warp Server39Overzicht39De afdrukserver configureren40De werkgroep-/domeinnaam wijzigen met TELNET of BRCONFIG of een webbrowser41NetBIOS Port Monitor voor Windows® 95/98/Me /2000/XP en Windows NT® 4.042De Brother NetBIOS Port Monitor installeren42Aan de printer koppelen43Windows® 95/98/Me43Windows NT® 4.0 /Windows® 2000/XP44Een tweede NetBIOS-poort toevoegen45Windows® 95/98/Me45Windows NT® 4.0 /Windows® 2000/XP46LAN Server/OS/2 Warp Server configureren46De server configureren46Het werkstation configureren47Andere bronnen van informatie47Afdrukken via internet configureren voor Windows®48Afdrukken via internet installeren48Overzicht48Algemene informatie over Brother Internet Print49Brother Internet Print: De Brother-afdrukserver configureren50Controlelijst bij het configureren van de afdrukserver50Brother Internet Print: BRAdmin gebruiken om de afdrukserver te configureren51Brother Internet Print: De afdrukserver configureren met een webbrowser52Brother Internet Print: TELNET gebruiken om de afdrukserver te configureren53Brother Internet Print: De BIP-software installeren in Windows® 95/98/Me/2000/XP en Windows NT® 4.054Installatie vanaf cd-rom54Een tweede Brother Internetpoort toevoegen57Afdrukken via IPP onder Windows® 2000/XP57Een andere URL specificeren59Andere bronnen van informatie59Afdrukken via Novell NetWare60Afdrukken via Novell NetWare configureren60Overzicht60Algemene informatie61Een NDPS-printer maken met NWADMIN voor NetWare562NDPS-manager62NDPS-broker63Een afdrukagent maken64Netware 3- en NetWare 4-systemen configureren65De afdrukserver van Brother met BRAdmin configureren (modus Wachtrijserver in bindery-emulatie)65De afdrukserver van Brother configureren met BRAdmin (modus Wachtrijserver in NDS-modus)67De afdrukserver van Brother configureren met Novell NWADMIN en BRAdmin (modus Wachtrijserver in NDS-modus)68De afdrukserver van Brother configureren met Novell NWAdmin en BRAdmin (modus Externe server in NDS-modus)71De afdrukserver van Brother configureren met PCONSOLE en BRCONFIG (modus Wachtrijserver in bindery-emulatie)73De afdrukserver van Brother configureren met PCONSOLE en BRCONFIG (modus Wachtrijserver in NDS-modus)74De afdrukserver van Brother configureren (De modus Externe printer) met PCONSOLE en BRCONFIG77Andere bronnen van informatie81Afdrukken vanaf Macintosh®82Afdrukken vanaf een Macintosh® met AppleTalk® en TCP/IP of de eenvoudige netwerkconfiguratie van Mac OS® X82Overzicht82Macintosh® configureren (Mac OS® 8.6 t/m 9.2)84De afdrukserver selecteren (AppleTalk/EtherTalk)85De afdrukserver selecteren (TCP/IP)85Macintosh® configureren (Mac OS® X 10.1/10.2)89De afdrukserver selecteren (AppleTalk/EtherTalk)89De afdrukserver selecteren (TCP/IP)90Afdrukken vanaf een Macintosh® met de eenvoudige netwerkconfiguratie van Mac OS® X (Mac OS® X 10.2.4 - 10.3 of recenter)91De printerdriver selecteren91De configuratie wijzigen92Andere bronnen van informatie92Afdrukken via DLC93Afdrukken vanaf Windows NT® 4.0 of Windows® 200093Overzicht93DLC op Windows NT® 4.0 en Windows® 2000 configureren93Printer instellen onder Windows® 200094Printer instellen onder Windows NT® 4.095DLC op andere systemen configureren96Andere bronnen van informatie97Beheer via een webbrowser98Een webbrowser gebruiken om uw printer te beheren98Overzicht98Via een browser verbinding maken met de printer99Andere bronnen van informatie99TCP/IP configureren100TCP/IP-informatie toewijzen100Overzicht100Het bedieningspaneel van de printer gebruiken voor het toewijzen van een IP-adres (uitsluitend voor printers met LCD-scherm)101Het IP-adres wijzigen met BRAdmin101BRAdmin en het IPX/SPX-protocol gebruiken om het IP-adres in te stellen102BRAdmin en het TCP/IP-protocol gebruiken om het IP-adres in te stellen103DHCP gebruiken om het IP-adres te configureren104APIPA gebruiken om het IP-adres te configureren104ARP gebruiken voor het configureren van het IP- adres van de afdrukserver105RARP gebruiken voor het configureren van het IP-adres107BOOTP gebruiken voor het configureren van het IP-adres108Het IP-adres configureren met BRCONFIG109De instellingen van het IP-adres wijzigen met de TELNET-console110Problemen oplossen112Overzicht112Problemen met de installatie112Onregelmatige werking115Problemen met TCP/IP oplossen115Problemen met UNIX oplossen116Problemen met Windows NT® 4.0/LAN Server (TCP/IP) oplossen118Problemen oplossen met Windows® 95/98/Me en peer-to-peer afdrukken (LPR)118Problemen oplossen met Windows® 95/98/Me en peer-to-peer afdrukken (HP JetAdmin-compatibele methode)119Problemen oplossen met Windows® 95/98/Me en Windows NT® 4.0 en peer-to-peer afdrukken (NetBIOS)119Problemen met afdrukken via Internet (BIP) (TCP/IP) oplossen120Problemen oplossen met Windows® 95/98/Me /2000/XP en IPP120Problemen met Novell NetWare oplossen121Problemen met AppleTalk oplossen122Problemen met DLC/LLC oplossen123Problemen met afdrukken via de webbrowser oplossen (TCP/IP)123Appendix124Appendix A124Algemene informatie124BRAdmin (aanbevolen)124Web BRAdmin124HTTP (aanbevolen)125WebJetAdmin125TELNET125BRCONFIG125Services gebruiken126Algemeen126De firmware van de afdrukserver opnieuw laden127Algemeen127Firmware opnieuw laden met BRAdmin128Opnieuw laden129Opnieuw laden via het FTP-protocol bij een opdrachtprompt130Opnieuw laden via het FTP-protocol met een webbrowser131INDEX133Größe: 990 KBSeiten: 135Language: NederlandsHandbuch öffnen